![]()
![]()
![]()


Forest is an implementation of Filecoin written in Rust. The implementation takes a modular approach to building a full Filecoin node in two parts — (i) building Filecoin’s security critical systems in Rust from the Filecoin Protocol Specification, specifically the virtual machine, blockchain, and node system, and (ii) integrating functional components for storage mining and storage & retrieval markets to compose a fully functional Filecoin node implementation.
Functionality
- Filecoin State Tree Synchronization
- Filecoin JSON-RPC Server
- Ergonomic Message Pool
- Wallet CLI
- Process Metrics & Monitoring
Disclaimer
The Forest implementation of the Filecoin protocol is alpha software which should not yet be integrated into production workflows. The team is working to provide reliable, secure, and efficient interfaces to the Filecoin ecosystem. If you would like to chat, please reach out over Discord on the ChainSafe server linked above.
Basic Usage
Installation with pre-built binaries
To install Forest from pre-compiled binaries, please refer to the releases page or consider using Forest Docker image (explained in detail here).
Installation from source
Dependencies
- Rust - install via rustup
- OS Base-Devel/Build-Essential
- Clang compiler
- OpenCL bindings
For Ubuntu, you can install the dependencies (excluding Rust) with:
sudo apt install build-essential clang
Compilation & installation
From crates.io (latest release)
cargo install forest-filecoin
From repository (latest development branch)
# Clone the Forest repository
git clone --depth 1 https://github.com/ChainSafe/forest.git && cd forest
make install
Both approaches will compile and install forest and forest-cli to
~/.cargo/bin. Make sure you have it in your PATH.
Verifying the installation
Ensure that Forest was correctly installed.
forest --version
# forest-filecoin 0.10.0+git.2eaeb9fee
Synchronize to the Filecoin network
Start the forest node. It will automatically connect to the bootstrap peers
and start syncing the chain after the snapshot is downloaded. If it is your
first time running the node, it will take a while to download the snapshot. Note
that you will need at least 8GB of RAM to sync the mainnet chain, and over 100
GB of free disk space.
Mainnet
forest
Calibnet
forest --chain calibnet
In another shell, you can invoke commands on the running node using
forest-cli. For example, to check the synchronization status:
forest-cli sync status
CLI
The Forest CLI allows for operations to interact with a Filecoin node and the blockchain.
Environment Variables
For nodes not running on a non-default port, or when interacting with a node
remotely, you will need to provide the multiaddress information for the node.
You will need to either set the environment variable FULLNODE_API_INFO, or
prepend it to the command, like so:
FULLNODE_API_INFO="..." forest-wallet new -s bls
On Linux, you can set the environment variable with the following syntax
export FULLNODE_API_INFO="..."
Setting your API info this way will limit the value to your current session. Look online for ways to persist this variable if desired.
The syntax for the FULLNODE_API_INFO variable is as follows:
<admin_token>:/ip4/<ip of host>/tcp/<port>/http
This will use IPv4, TCP, and HTTP when communicating with the RPC API. The admin token can be found when starting the Forest daemon. This will be needed to create tokens with certain permissions such as read, write, sign, or admin.
Token flag
For nodes running on default port and when you are interacting locally, the
admin token can also be set using --token flag:
forest-cli --token eyJ0eXAiOiJKV1QiLCJhbGciOiJIUzI1NiJ9.eyJBbGxvdyI6WyJyZWFkIiwid3JpdGUiLCJzaWduIiwiYWRtaW4iXSwiZXhwIjoxNjczMjEwMTkzfQ.xxhmqtG9O3XNTIrOEB2_TWnVkq0JkqzRdw63BdosV0c <subcommand>
Chain-Sync
The chain-sync CLI can mark blocks to never be synced, provide information about the state of the syncing process, and check blocks that will never be synced (and for what reason).
Wait Wait for the sync process to be complete Usage: forest-cli sync wait
Permissions: Read
Status Check the current state of the syncing process, displaying some
information Usage: forest-cli sync status Permissions: Read
Check Bad Check if a block has been marked by, identifying the block by CID
Usage: forest-cli sync check-bad -c <block cid> Permissions: Read
Mark Bad Mark a block as bad, the syncer will never sync this block Usage:
forest-cli sync mark-bad -c <block cid> Permissions: Admin
Message Pool
The Message Pool (mpool) is the component of forest that handles pending messages that have reached the node for inclusion in the chain.
Display the list of all pending messages
Usage: forest-cli mpool pending
Example:
{
  "Message": {
    "Version": 0,
    "To": "t01491",
    "From": "t3sg27lp6xgz3fb7db7t4x4lhmsf3dgu73mj5sodkshh64ftr6dzkrfxrowroon2cr2f3vkumsi4schkpfyvea",
    "Nonce": 14704,
    "Value": "0",
    "GasLimit": 31073678,
    "GasFeeCap": "100507",
    "GasPremium": "99453",
    "Method": 6,
    "Params": "iggZG3DYKlgpAAGC4gOB6AIgRRHJtEnHDx51h/M46ebVUjTD1kowbg+8uWOSrQnQYWwaAAaPXIAaAB45DvQAAAA=",
    "CID": {
      "/": "bafy2bzaceacz2f5k5pcjhzvodhpgin2phycgk2magezaxxp7wcqrjvobbtj5w"
    }
  },
  "Signature": {
    "Type": 2,
    "Data": "hcBY3OATkjMBRly96aViP2CR0R68dqnmlB1k6g2C2EXfe7+AsCN7bF4+M5bA6SecCsP2Fx+NwYkpGBi1CFGon5U9bqilMIiXxuK0mIrNO0d6UocCBGi/IVZwW2K4hT9N"
  },
  "CID": {
    "/": "bafy2bzaceacz2f5k5pcjhzvodhpgin2phycgk2magezaxxp7wcqrjvobbtj5w"
  }
}
Display the CIDs of pending messages
Usage: forest-cli mpool pending --cids
Display the locally published messages only
Usage: forest-cli mpool pending --local
Display the list of all pending messages originating from a given address
Usage: forest-cli mpool pending --from <address>
Display the list of all pending messages going to a given address
Usage: forest-cli mpool pending --to <address>
You can retrieve statistics about the current messages in the pool.
Display statistics of all pending messages
Usage: forest-cli mpool stat
Example:
t3ub2uupkvfwp7zckda2songtluquirgxnooocjfifq6qesxre4igoc3u62njgvmmgnyccmowshbmrolkuni7a: Nonce past: 3, cur: 0, future: 1; FeeCap cur: 0, min-60: 0, gasLimit: 186447391
t3wikyuoalsqxathxey5jcsiowhbmy5o2ip6l4lvpna2rjxjd7micrgmlppjmwwcsnll7xgqzhlqqs6j4xk3oa: Nonce past: 1, cur: 0, future: 0; FeeCap cur: 0, min-60: 0, gasLimit: 66357410
t3wt6c4wla5egncjsgq67lsu4wzu4xtnbeskgupty7udysbiqkr4sw6inqli2nazks2ypwwnmlahtkzd4ghjja: Nonce past: 1, cur: 0, future: 0; FeeCap cur: 0, min-60: 0, gasLimit: 44752713
-----
total: Nonce past: 5, cur: 0, future: 1; FeeCap cur: 0, min-60: 0, gasLimit: 297557514
The Nonce past, cur (current) and future metrics indicate for each sending
account actor (the first address) how its message nonces are comparing
relatively to its own nonce.
A positive past number indicates messages that have been mined but that are
still present in the message pool and/or messages that could not get included in
a block. A positive cur number indicates all messages that are waiting to be
included in a block. A high number here could mean that the network is enduring
some congestion (if those messages are yours, you need to pay attention to the
different fees you are using and adjust them). A positive future number means
either that your forest node is not fully synced yet or if you are in sync that
some messages are using a too small nonce.
The FeeCap cur and min-60 indicate how many messages from the sending
account actor have their basefee below to the current tipset basefee and the
minimum basefee found in the last 60 tipsets, respectively (use
--basefee-lookback flag to change the number of lookback tipsets).
The gasLimit value indicates the sum of gasLimit of all messages from each
sending actor.
The final total line is the accumulated sum of each metric for all messages.
Wallet handling
There are two wallets for Forest: One is accessible by the Forest node, and one is only accessible by you. It is recommended that you only use the local wallet for security reasons. The wallet in the Forest node exists for backward compatibility with Lotus.
Configuration
To query an account's balance or transfer funds, you need access to a running Filecoin node. You can run such a node yourself or use a publicly available node. As a rule of thumb, only send real money through a node that you trust. The rest of this document will assume you're using play money on calibnet.
Glif.io runs a public Filecoin node at that we can use by setting
FULLNODE_API_INFO:
export FULLNODE_API_INFO=/dns/api.calibration.node.glif.io/tcp/443/https
Creating an account
Initially, our wallet contains no addresses:
$ forest-wallet list
Address                                   Default Balance
Let's create a new address and inspects its balance:
$ forest-wallet new
t15ydyu3d65gznpp2qxwpkjsgz4waubeunn6upvla
$ forest-wallet list
Address                                   Default Balance
t15ydyu3d65gznpp2qxwpkjsgz4waubeunn6upvla  X        0 FIL
The generated address will be unique and it will have a balance of 0 FIL.
Since this is a testnet account, we can add FIL to it from the
faucet/alternate faucet.
After requesting the funds and waiting roughly a minute, we can see the funds arrive in our wallet:
$ forest-wallet list
Address                                   Default Balance
t15ydyu3d65gznpp2qxwpkjsgz4waubeunn6upvla  X        100 FIL
Sending Filecoin tokens from your wallet
Let's create a new, empty account:
$ forest-wallet new
t14tgmcxrcohfstxuxfbfk2vrjr3tqmefzlajp52y
$ forest-wallet list
Address                                   Default Balance
t14tgmcxrcohfstxuxfbfk2vrjr3tqmefzlajp52y           0 FIL
t15ydyu3d65gznpp2qxwpkjsgz4waubeunn6upvla  X        100 FIL
We can transfer FIL to this new account from our default account:
$ forest-wallet send t14tgmcxrcohfstxuxfbfk2vrjr3tqmefzlajp52y "1.2 FIL"
bafy2bzaceasy7bzgjwnl4mbjp3tfxdeq4mvdvfne7fj773w7x4d6ah7cdabkc
It takes a minute or so for the transaction to be included in the Filecoin blockchain. Once the transaction has gone through, we can inspect our balances:
$ forest-wallet list
Address                                   Default Balance
t14tgmcxrcohfstxuxfbfk2vrjr3tqmefzlajp52y           1200 milliFIL
t15ydyu3d65gznpp2qxwpkjsgz4waubeunn6upvla  X        ~98800 milliFIL
The gas cost of the transaction is automatically paid from the sending account.
CLI
The forest-wallet executable offers several subcommand and options:
USAGE:
  forest-wallet [OPTIONS] <COMMAND>

SUBCOMMANDS:
  new               Create a new wallet
  balance           Get account balance
  default           Get the default address of the wallet
  export            Export the wallet's keys
  has               Check if the wallet has a key
  import            Import keys from existing wallet
  list              List addresses of the wallet
  set-default       Set the default wallet address
  sign              Sign a message
  validate-address  Validates whether a given string can be decoded
                    as a well-formed address
  verify            Verify the signature of a message. Returns true
                    if the signature matches the message and address
  delete            Deletes the wallet associated with the given address
  send              Send funds between accounts
  help              Print this message or the help of the given subcommand(s)

OPTIONS:
      --token <TOKEN>  Admin token to interact with the node
      --remote-wallet  Use remote wallet associated with the Filecoin node
      --encrypt        Encrypt local wallet
  -h, --help           Print help
  -V, --version        Print version
Lotus compatiblity
If you want to use the builtin wallet in a Lotus or Forest node, you can use the
forest-wallet executable with the --remote-wallet option. The subcommands
remain the same but require write access to the remote Filecoin node.
Configuration
The forest process has a set of configurable values which determine the
behavior of the node. All values can be set through process flags or through a
configuration file. If a configuration is provided through the flag and the
configuration file, the flag value will be given preference.
Flags
When starting forest you can configure the behavior of the process through the
use of the following flags:
| Flag | Value | Description |
|---|---|---|
| --config | OS File Path | Path to TOML file containing configuration |
| --genesis | OS File Path | CAR file with genesis state |
| --rpc | Boolean | Toggles the RPC API on |
| --port | Integer | Port for JSON-RPC communication |
| --token | String | Client JWT token to use for JSON-RPC authentication |
| --metrics-port | Integer | Port used for metrics collection server |
| --kademlia | Boolean | Determines whether Kademilia is allowed |
| --mdns | Boolean | Determines whether MDNS is allowed |
| --import-snapshot | OS File Path | Path to snapshot CAR file |
| --consume-snapshot | OS File Path | Path to snapshot CAR file (delete after importing) |
| --import-chain | OS File Path | Path to chain CAR file |
| --skip-load | Boolean | Skips loading CAR File and uses header to index chain |
| --req-window | Integer | Sets the number of tipsets requested over chain exchange |
| --tipset-sample-size | Integer | Number of tipsets to include in the sample which determines the network head during synchronization |
| --target-peer-count | Integer | Amount of peers the node should maintain a connection with |
| --encrypt-keystore | Boolean | Controls whether the keystore is encrypted |
Configuration File
Alternatively, when starting forest you can define a TOML configuration file
and provide it to the process with the --config flag or through the
FOREST_CONFIG_PATH environment variable.
The following is an sample configuration file:
genesis = "/path/to/genesis/file"
rpc = true
port = 1234
token = "0394j3094jg0394jg34g"
metrics-port = 2345
kademlia = true
mdns = true
import-snapshot = /path/to/snapshot/file
import-chain = /path/to/chain/file
skip-load = false
req-window = 100
tipset-sample-size = 10
target-peer-count = 100
encrypt-keystore = false
Environment variables
Besides CLI options and the configuration values in the configuration file,
there are some environment variables that control the behaviour of a forest
process.
| Environment variable | Value | Default | Description |
|---|---|---|---|
| FOREST_KEYSTORE_PHRASE | any text | empty | The passphrase for the encrypted keystore |
| FOREST_CAR_LOADER_FILE_IO | 1 or true | false | Load CAR files with RandomAccessFile instead of Mmap |
| FOREST_DB_DEV_MODE | see here | current | The database to use in development mode |
| FOREST_ACTOR_BUNDLE_PATH | file path | empty | Path to the local actor bundle, download from remote servers when not set |
| FIL_PROOFS_PARAMETER_CACHE | dir path | empty | Path to folder that caches fil proof parameter files |
| FOREST_PROOFS_ONLY_IPFS_GATEWAY | 1 or true | false | Use only IPFS gateway for proofs parameters download |
| FOREST_FORCE_TRUST_PARAMS | 1 or true | false | Trust the parameters downloaded from the Cloudflare/IPFS |
| IPFS_GATEWAY | URL | https://proofs.filecoin.io/ipfs/ | The IPFS gateway to use for downloading proofs parameters |
FOREST_DB_DEV_MODE
By default, Forest will create a database of its current version or try to
migrate to it. This can be overridden with the FOREST_DB_DEV_MODE
environmental variable.
| Value | Description |
|---|---|
current or (unset) | Forest will either create a new database with the current version or attempt a migration if possible. On failure, it will create a new database. |
latest | Forest will use the latest versioned database. No migration will be performed. |
other values (e.g., cthulhu) | Forest will use the provided database (if it exists, otherwise it will create one under this name) |
The databases can be found, by default, under <DATA_DIR>/<chain>/, e.g.,
$HOME/.local/share/forest/calibnet.
Forest in Docker🌲❤️🐋
Prerequisites
- Docker engine installed and running. Forest containers are confirmed to run on
the following engines:
- Docker Engine (Community) on Linux,
- Docker for macOS
- Podman on WSL
Native images are available for the following platforms:
linux/arm64linux/amd64
The images will work out-of-the box on both Intel processors and macOS with M1/M2.
Tags
For the list of all available tags please refer to the Forest packages.
Currently, the following tags are produced:
latest- latest stable release,edge- latest development build of themainbranch,date-digeste.g.,2023-02-17-5f27a62- all builds that landed on themainbranch,- release tags, available from
v.0.7.0onwards.
Security recommendations
- We strongly recommend running the docker daemon in rootless mode
(installation instructions),
or running the daemon-less docker alternative
podman(installation instructions) with non-root user and putalias docker = podman(or manually replace thedockercommands withpodmanin below instructions)
Performance recommendations
- We recommend lowering the swappiness kernel parameter on linux to 1-10 for
long running forest node by doing
sudo sysctl -w vm.swappiness=[n].
Usage
List available flags and/or commands
# daemon
❯ docker run --init -it --rm ghcr.io/chainsafe/forest:latest --help
# cli
❯ docker run --init -it --rm --entrypoint forest-cli ghcr.io/chainsafe/forest:latest --help
Also see the CLI documentation for more details about commands and their usage.
Create a Forest node running calibration network. Then list all connected peers.
❯ docker run --init -it --rm --name forest ghcr.io/chainsafe/forest:latest --chain calibnet --auto-download-snapshot
then in another terminal (sample output)
❯ docker exec -it forest forest-cli net peers
12D3KooWAh4qiT3ZRZgctVJ8AWwRva9AncjMRVBSkFwNjTx3EpEr, [/ip4/10.0.2.215/tcp/1347, /ip4/52.12.185.166/tcp/1347]
12D3KooWMY4VdMsdbFwkHv9HxX2jZsUdCcWFX5F5VGzBPZkdxyVr, [/ip4/162.219.87.149/tcp/30141, /ip4/162.219.87.149/tcp/30141/p2p/12D3KooWMY4VdMsdbFwkHv9HxX2jZsUdCcWFX5F5VGzBPZkdxyVr]
12D3KooWFWUqE9jgXvcKHWieYs9nhyp6NF4ftwLGAHm4sCv73jjK, [/dns4/bootstrap-3.calibration.fildev.network/tcp/1347]
Use a shared volume to utilise across different Forest images
Create the volume
docker volume create forest-data
Now, whenever you create a new Forest container, attach the volume to where the
data is stored /home/forest/.local/share/forest.
❯ docker run --init -it --rm \
             --ulimit nofile=8192 \
             --volume forest-data:/home/forest/.local/share/forest \
             --name forest ghcr.io/chainsafe/forest:latest --chain calibnet
                                                           --auto-download-snapshot
Export the calibnet snapshot to the host machine
Assuming you have forest container already running, run:
❯ docker exec -it forest forest-cli --chain calibnet snapshot export
Export completed. Snapshot located at forest_snapshot_calibnet_2023-02-17_height_308891.car
Copy the snapshot to the host
❯ docker cp forest:/home/forest/forest_snapshot_calibnet_2023-02-17_height_308891.car .
Create and fund a wallet, then send some FIL on calibration network
Assuming you have forest container already running, you need to find the JWT
token in the logs.
❯ docker logs forest | grep "Admin token"
export it to an environmental variable for convenience (sample, use the token you obtained in the previous step)
export JWT_TOKEN=eyJ0eXAiOiJKV1QiLCJhbGciOiJIUzI1NiJ9.eyJBbGxvdyI6WyJyZWFkIiwid3JpdGUiLCJzaWduIiwiYWRtaW4iXSwiZXhwIjoxNjgxODIxMTc4fQ.3toXEeiGcHT01pUjQeqMyW2kZmQpqpE4Gi4vOHjX4rE
Create the wallet
❯ docker exec -it forest forest-wallet --token $JWT_TOKEN new
t1uvqpa2jgic7fhhko3w4wf3kxj36qslvqrk2ln5i
You can fund your wallet using this faucet. If this faucet is unavailable or does not work, there is an alternative faucet. You can verify your wallet was funded after a few minutes in Filscan by pasting the Message ID obtained from the faucet. Example from this wallet.
Verify that your account has 100 FIL . The result is in attoFIL.
❯ docker exec -it forest forest-wallet --token $JWT_TOKEN balance t1uvqpa2jgic7fhhko3w4wf3kxj36qslvqrk2ln5i
100000000000000000000
Create another wallet
❯ docker exec -it forest forest-wallet --token $JWT_TOKEN new
t1wa7lgs7b3p5a26abkgpxwjpw67tx4fbsryg6tca
Send 10 FIL from the original wallet to the new one (default unit for the amount in send command is FIL).
❯ docker exec -it forest forest-cli --chain calibnet --token $JWT_TOKEN send --from t1uvqpa2jgic7fhhko3w4wf3kxj36qslvqrk2ln5i t1wa7lgs7b3p5a26abkgpxwjpw67tx4fbsryg6tca 10
Verify the balance of the new address. Sample transaction for this wallet.
❯ docker exec -it forest forest-wallet --token $JWT_TOKEN balance t1wa7lgs7b3p5a26abkgpxwjpw67tx4fbsryg6tca
10000000000000000000
Healthcheck 🩺
It is helpful for monitoring and alerting systems to check if the node is up and running out of the box. Forest ships with a set of healthcheck endpoints that can be used to monitor the node status and perform actions based on the results.
Endpoints
All healthcheck endpoints operate on port 2346 by default. This behaviour can
be changed via the --healthcheck-address flag. All endpoints expose a
verbose optional query parameter that can be used to get more detailed
information about the node's health status.
Endpoints return a 200 OK status code if the node is healthy and a
503 Service Unavailable status code if the node is not healthy.
/livez
Liveness probes determine whether or not an application running in a container is in a healthy state. The idea behind a liveness probe is that it fails for prolonged period of time, then the application should be restarted. In our case, we require:
- The node is not in an error state (i.e., boot-looping)
- At least 1 peer is connected (without peers, the node is isolated and cannot sync)
If any of these conditions are not met, the node is not healthy. If this happens for a prolonged period of time, the application should be restarted.
Sample lively response:
❯ curl "http://127.0.0.1:2346/livez?verbose"
[+] sync ok
[+] peers connected⏎
Sample not lively response:
❯ curl "http://127.0.0.1:2346/livez?verbose"
[+] sync ok
[!] no peers connected
/readyz
Readiness probes determine whether or not a container is ready to serve requests. The goal is to determine if the application is fully prepared to accept traffic. In our case, we require:
- The node is in sync with the network
- The current epoch of the node is not too far behind the network
- The RPC server is running
If any of these conditions are not met, the nod is not ready to serve requests.
Sample ready response:
❯ curl "http://127.0.0.1:2346/readyz?verbose"
[+] sync complete
[+] epoch up to date
[+] rpc server running⏎
Sample not ready response:
❯ curl "http://127.0.0.1:2346/readyz?verbose"
[!] sync incomplete
[!] epoch outdated
[+] rpc server running⏎
/healthz
This endpoint is a combination of the /livez and /readyz endpoints, except
that the node doesn't have to be fully synced. Deprecated in the Kubernetes
world, but still used in some setups.
Sample healthy response:
❯ curl "http://127.0.0.1:2346/healthz?verbose"
[+] sync complete
[+] epoch up to date
[+] rpc server running
[+] sync ok
[+] peers connected⏎
Sample unhealthy response:
❯ curl "http://127.0.0.1:2346/healthz?verbose"
[!] sync incomplete
[!] epoch outdated
[+] rpc server running
[+] sync ok
[!] no peers connected⏎
Snapshot exporting 📸
Hardware requirements
To export a mainnet snapshot, you need a setup with at least 10 GB of RAM. On a machine with rapid NVMe SSD (around 7000MB/s), the export should take around 30 minutes.
The requirements for calibnet snapshots are lower, but it is still recommended to have at least 4 GB of RAM. The export should take less than a minute.
Running the node
You need to have a running node to be able to export a snapshot. If you don't have one, you can follow the usage guide.
Wait until the node is fully synced. You can use the command:
forest-cli sync wait
Exporting the snapshot
Usage of the snapshot export command:
Usage: forest-cli snapshot export [OPTIONS]

Options:
  -o <OUTPUT_PATH>      Snapshot output filename or directory. Defaults to
                        `./forest_snapshot_{chain}_{year}-{month}-{day}_height_{epoch}.car.zst`. [default: .]
      --skip-checksum   Skip creating the checksum file
      --dry-run         Don't write the archive
  -h, --help            Print help
The snapshot will be exported with 2000 recent stateroots.
To export the snapshot with the defaults, run:
forest-cli snapshot export
it will write the snapshot to the current directory. The snapshot will be compressed.
For mainnet, you should expect a file of over 50 GB. For calibnet, you should expect a file of around 1-2 GB.
JSON-RPC API
This API is still a WIP, with more methods being added continuously.
Need a specific method? Let us know on
Github or Filecoin Slack
(#fil-forest-help) 🙏
Overview
The RPC interface is the primary mechanism for interacting with Forest. The implementation is still a WIP, with support for more methods being added continuously.
As there is presently no cross-client specification, the Lotus V0 and V1 APIs are the reference for Forest's implementation.
Supported Methods
We currently track all methods and their implementation state here.
Forest JavaScript Console
Forest console stands as an alternative to tools like
Curl or other subcommands found in forest-cli
for interacting with the Filecoin JSON-RPC API.
Starting the console
forest-cli attach can be used to open a Javascript console connected to your
Forest node.
Like for some other forest-cli subcommands you will need to pass an admin
--token given what endpoints you will call.
For a description of different options please refer to the CLI page.
Interactive Use
First start Forest node inside another terminal:
forest --chain calibnet
To attach to your Forest node, run forest-cli with the attach subcommand:
forest-cli --token <TOKEN> attach
You should now see a prompt and be able to interact:
Welcome to the Forest Javascript console!

To exit, press ctrl-d or type :quit
> console.log("Forest running on " + chainGetName())
Forest running on calibnet
You can directly call JSON-RPC API endpoints that are bound to the console.
For example, Filecoin.ChainGetName is bound to the global chainGetName
function.
Tips
- The console history is saved in your
~/.forest_historyafter exiting. - Use
:clearto erase current session commands. - Use
_BOA_VERSIONto get engine version
Non-interactive Use
Exec Mode
It is also possible to execute commands non-interactively by passing --exec
flag and a JavaScript snippet to forest-cli attach. The result is displayed
directly in the terminal rather than in the interactive console.
For example, to display the current epoch:
forest-cli attach --exec "syncStatus().ActiveSyncs[0].Epoch"
Or print wallet default address:
forest-cli attach --exec "console.log(walletDefaultAddress())"
Builtins
Helpers
Forest console comes with a number of helper functions that make interacting with Filecoin API easy:
showPeers()getPeer(peerID)disconnectPeers(count)isPeerConnected(peerID)showWallet()showSyncStatus()sendFIL(to, amount)(default amount unit is FIL)
Timers
In addition, to support part of the JavaScript language, the console also
provides implementation for sleep(seconds) timer and a tipset based timer,
sleepTipsets(epochs), which sleeps till the number of new tipsets added is
equal to or greater than epochs.
Modules
CommonJS modules is the way to package JavaScript code for Forest console. You
can import modules using the require function:
forest-cli attach --exec "const Math = require('calc'); console.log(Math.add(39,3))"
where calc.js is:
module.exports = {
  add: function (a, b) {
    return a + b;
  },
  multiply: function (a, b) {
    return a * b;
  },
};
By default modules will be loaded from the current directory. Use --jspath
flag to indicate another path.
Limitations
Forest's console is built using
Boa Javascript engine. It does support
promises or async functions, but keep in mind that Boa is not fully compatible
with ECMAScript yet.
Not every endpoint from the Filecoin API has been bound to the console. Please create an issue if you need one that is not available.
Forest Backups
"The condition of any backup is unknown until a restore is attempted." Everyone who deals with backups.
Manual backups
The manual way requires knowledge of Forest internals and how it structures its data directory (which is not guaranteed to stay the same). Thus, it is recommended to use alternatives.
Backups with the forest-tool
Forest comes with a forest-tool binary, which handles creating and recovering
backups.
Basic usage
:warning: The Forest node should be offline during the backup process, especially when backing up the blockstore.
forest-tool backup create will create a backup file in the current working
directory. It will contain the p2p keypair used to derive the PeerId and the
keystore. If storing anywhere, make sure to encrypt it.
❯ forest-tool backup create
Adding /home/rumcajs/.local/share/forest/libp2p/keypair to backup
Adding /home/rumcajs/.local/share/forest/keystore.json to backup
Backup complete: forest-backup-2024-02-22_17-18-43.tar
Afterwards, you can use forest-tool backup restore <backup-file> to restore
those files. Note that this assumes that Forest is using the default
configuration - if it's not the case, provide the configuration TOML file via
the --daemon-config parameter.
❯ forest-tool backup restore forest-backup-2024-02-22_17-18-43.tar
Restoring /home/rumcajs/.local/share/forest/libp2p/keypair
Restoring /home/rumcajs/.local/share/forest/keystore.json
Restore complete
There are other flags to the backup tool, most notably --all, that will back
up the entire Forest data directory. Note that this includes the whole
blockstore, which, for mainnet, can reach hundreds of gigabytes. It is not
recommended outside development.
backup
Create and restore backups

Usage: forest-tool backup <COMMAND>

Commands:
  create   Create a backup of the node. By default, only the p2p keypair and keystore are backed up. The node must be offline
  restore  Restore a backup of the node from a file. The node must be offline
  help     Print this message or the help of the given subcommand(s)
backup create
Create a backup of the node. By default, only the p2p keypair and keystore are backed up. The node must be offline

Usage: forest-tool backup create [OPTIONS]

Options:
      --backup-file <BACKUP_FILE>      Path to the output backup file if not using the default
      --all                            Backup everything from the Forest data directory. This will override other options
      --no-keypair                     Disables backing up the keypair
      --no-keystore                    Disables backing up the keystore
      --backup-chain <BACKUP_CHAIN>    Backs up the blockstore for the specified chain. If not provided, it will not be backed up
      --include-proof-params           Include proof parameters in the backup
  -d, --daemon-config <DAEMON_CONFIG>  Optional TOML file containing forest daemon configuration. If not provided, the default configuration will be used
  -h, --help                           Print help
backup restore
Restore a backup of the node from a file. The node must be offline

Usage: forest-tool backup restore [OPTIONS] <BACKUP_FILE>

Arguments:
  <BACKUP_FILE>  Path to the backup file

Options:
  -d, --daemon-config <DAEMON_CONFIG>  Optional TOML file containing forest daemon configuration. If not provided, the default configuration will be used
      --force                          Force restore even if files already exist WARNING: This will overwrite existing files
  -h, --help                           Print help
Trouble Shooting
Common Issues
Jemalloc issues on Apple Silicon macs
Forest is compiled with jemalloc as a default allocator. If you are having
problems running or compiling Forest, use this checklist:
- Make sure you are using an arm64 version of homebrew; this could be a problem one inherits when migrating from an Intel Mac to Apple Silicon: Stackoverflow example.
- Make sure your default host is set to
aarch64-apple-darwinviarustup set default-host aarch64-apple-darwin. - This could result in various errors related to the fact that you still have
some of the libraries symlinked to
/usr/local/libfrom an intel Homebrew installation. The easiest fix for this is:- Remove the libraries in question from
/usr/local/lib. - Add
export LIBRARY_PATH=/opt/homebrew/libto your bash profile. - Source the new bash profile.
- Remove the libraries in question from
Algorand
Algorand is a proof-of-stake blockchain cryptocurrency protocol.
BLAKE2b
BLAKE2 is a cryptographic hash function based on BLAKE. The design goal was to replace the widely used, but broken, MD5 and SHA-1 algorithms in applications requiring high performance in software.
BLS
BLS stands for Boneh–Lynn–Shacham cryptographic signature scheme, which is a cryptographic signature scheme which allows a user to verify that a signer is authentic.
CBOR
CBOR stands for the Concise Binary Object Representation, which is a data format whose design goals include the possibility of extremely small code size, fairly small message size, and extensibility without the need for version negotiation.
CID
CID is short for Content Identifier, a self describing content address used throughout the IPFS ecosystem. CIDs are used in Filecoin to identify files submitted to the decentralized storage network. For more detailed information, see the github documentation for it.
IPLD
IPLD stands for InterPlanetary Linked Data, which is a series of standards and formats for describing data in a content-addressing-emphatic way.
JWT
JWT stands for JSON Web Token, which is a proposed Internet standard for creating data with optional signature and/or optional encryption whose payload holds JSON that asserts some number of claims. The tokens are signed either using a private secret or a public/private key.
SECP
types of elliptic curves used for ECDSA see here
multisig
A multi-signature (multisig)
wallet refers to a wallet that requires multiple keys to authorize a FIL
transactions.
Tipset
Tipset is a structure that contains a non-empty collection of blocks that have distinct miners and all specify identical epoch, parents, weight, height, state root, receipt root
Tipsetkey
A set of CIDs forming a unique key for a tipset.
mempool
mempool stands for the Message Pool, which is the component of forest that handles pending messages for inclusion in the chain. Messages are added either directly for locally published messages or through pubsub propagation.
Merkle
Merkle tree is a tree in which every node is labelled with the cryptographic hash of a data block, and every node that is not a leaf (called a branch, inner node, or inode) is labelled with the cryptographic hash of the labels of its child nodes. A hash tree allows efficient and secure verification of the contents of a large data structure.
IPFS
IPFS stands for InterPlanetary File System which is a peer-to-peer hypermedia protocol to make the web faster, safer, and more open.
Proof of Spacetime (PoSt)
PoSt stands for Proof-of-Spacetime is a procedure by which a storage-miner can prove to the Filecoin network they have stored and continue to store a unique copy of some data on behalf of the network for a period of time.
HAMT
HAMT stands for Hash array mapped trie, which is an implementation of an associative array that combines the characteristics of a hash table and an array mapped trie.
VRF
VRF stands for a Verifiable Random Function that receives a Secret Key (SK) and a seed and outputs proof of correctness and output value. VRFs must yield a proof of correctness and a unique & efficiently verifiable output.
MDNS
MDNS stands for Multicast DNS, which is a protocol, that resolves hostnames to IP addresses within small networks that do not include a local name server.
Kademlia
Kademlia is a distributed hash table for decentralized peer-to-peer computer networks.
LibP2P
LibP2P is a modular system of protocols, specifications and libraries that enable the development of peer-to-peer network applications.
Developer documentation
In this section you will find resources targeted for Forest developers.
The application architecture of forest largely mirrors that of lotus:
- There is a core
StateManager, which accepts:
For more information, see the lotus documentation, including, where relevant, the filecoin specification.
(These also serve as a good introduction to the general domain, assuming a basic familiarity with blockchains.)
Contribuiting to Forest
Submitting Code
Please use make lint to ensure code is properly formatted, license headers are
present, and to run the linter.
Documentation
Please use the following guidelines while documenting code. Except for inline
comments, these should all be doc comments (///).
Methods/Functions
- At least a brief description
Structs
- At least a brief description
Traits
- At least a brief description
Enums
- At least a brief overall description.
- All variants should have a brief description.
Inline Comments
- Any complicated logic should include in-line comments (
//)
Database migrations
Problem
Storing data is one of the prime purposes of Forest, and we often play around with different layouts and database settings.
Up until now, we've been okay with deleting the database and starting from a fresh snapshot. This was annoying but acceptable since we never had more than 100GiB of data. Going forward, we'll be setting up nodes with ~14 TiB of data, and we want them to not require any maintenance when new versions of Forest are released.
Proposed solution
High-level flowchart:
flowchart TB
    RunForest[/Forest run/] --> DevMode{Development mode?}
    DevMode ==>|no| SameDbVersionExists{Same DB version already exists?}
    DevMode -->|yes| DevDbExists{Development DB exists?}
    subgraph development mode
        DevDbExists -->|no| CreateDevDb[Create development DB]
        DevDbExists -->|yes| OpenDevDb[Open development DB]
    end
    SameDbVersionExists -->|yes| Finish[Finish]
    SameDbVersionExists ==>|no| OlderDbVersionExists{Older DB version exists and migration possible?}:::Yellow
    OlderDbVersionExists -->|no| CreateVersionedDb
    OlderDbVersionExists ==>|yes| RunMigration[Run migration]:::Yellow
    RunMigration ==> RunChecks[Run checks]:::Yellow
    RunChecks ==> ChecksPassing{Checks passing?}:::Green
    ChecksPassing -->|yes| Finish
    ChecksPassing -->|no| CreateVersionedDb
    CreateVersionedDb --> Finish
    CreateDevDb --> Finish
    OpenDevDb --> Finish[/Run daemon/]

classDef Green stroke:#0f0,stroke-width:2px;
classDef Yellow stroke:#ff0,stroke-width:2px;
Expected migration path is marked in bold.
Scenarios to cover
Scenario 1: No DB exists
A new DB is created and the daemon is started. If the development environment
variable, the database is created under <DATA_DIR>/<NETWORK>/paritydb-dev.
Otherwise, it is created under <DATA_DIR>/<NETWORK>/paritydb-vX.Y.Z.
Scenario 2: DB exists, but is not the latest version (migration!)
An attempt to migrate the database is made, provided that the migration is defined. If the migration is not defined, a warning is displayed and Forest will start under a new database. Alternatively, we can choose to fail the migration and not start the daemon.
If migration succeeds and the checks are passing, the database is atomically
renamed to <DATA_DIR>/<NETWORK>/paritydb-vX.Y.Z and the daemon is started. If
the checks are not passing, the migration is cancelled, and we start the daemon
under a new database.
Scenario 3: DB exists and is the latest version
The daemon is started and the database path is not changed.
Scenario 4: DB exists and is newer than the daemon version
The daemon is started with a new database as migrating down is not supported.
Use cases
Developer, switching to newer branch (development mode)
An attempt will be made to open the database, it may succeed or not.
Developer, switching to older branch (development mode)
We don't support migrating down. An attempt will be made to open the database,
it may succeed or not. A possible development database is also the
<DATA_DIR>/<NETWORK>/paritydb database (what we currently use).
CI, accepting PR with a breaking change
To test that a breaking change is detected and handled correctly, we can use
Forest image with the latest tag.
- Run Forest with the
latesttag, sync up to the HEAD. We can use volumes to share the database between runs. - Run Forest from the current branch (re-using the database), sync up to the HEAD.
If the database is compatible or a migration is successful, the second run should be able to sync up to the HEAD. Otherwise, the second run should fail.
CI, sync check
Sync check is constantly checking new edge versions of Forest. It may be that
there are several breaking changes before we release a new version. Given that
supporting this may be a lot of work (reverts are permitted on main) and that
we are not sure if we want to support this, we can simply use the development
mode database for this.
User, upgrading to a new version
See scenario 2.
User, starting a new node from scratch
See Scenario 4.
Migration
flowchart TB
    MigrationExists{Migration exists?} -->|no| Fail[/Fail/]
    MigrationExists -->|yes| RunMigration[Run migration]
    RunMigration --> RunChecks[Run checks]
    RunChecks --> ChecksPassing{Checks passing?}
    ChecksPassing -->|yes| PersistDb[Persist DB] --> Finish[/Finish/]
    ChecksPassing -->|no| Fail
Note: migration is run on a temporary database. If the checks are passing, the result is persisted.
Checking if migration exists
We can use a graph to check if a migration exists. There doesn't have to be a direct path between two versions.
flowchart TB
    subgraph Basic with one version
        Version1 -.- Version2
        Version1 ==>|migration| Version2
    end
    subgraph Multiple versions direct migration
        Version3 -.- Version4 -.- Version5
        Version3 ==>|migration| Version5
    end
    subgraph Multiple versions indirect migration
        Version6 -.- Version7 -.- Version8
        Version6 ==>|migration| Version7 ==>|migration| Version8
    end
   linkStyle 1,4,7,8 stroke:#0f0,stroke-width:4px
Note: a migration may not exist by design.
Example migration
Let's consider the most basic change, a modification in the column settings. A possible algorithm for the migration is:
for each column in the current database:
  for each entry in the column:
    save the entry to a temporary database

if all entries are saved successfully:
  rename the temporary database to the new database
  remove the old database
else:
  fail the migration
Performance considerations
The migration is run on a temporary database. This means that it requires twice the regular disk space.
Potential improvements
In development mode, we could potentially try to use the existing versioned database.
There are often cases where the jobs fail at the CI and not locally, which tends to be cumbersome to debug. Also, when developing an integration test, it is useful to get immediate feedback instead of relying on Github Actions (which, on a side note, are sometimes down).
There is a tool called Act that allows you to run Github Actions locally. Given the complexity of Forest's CI, it is difficult to run the whole CI locally, but it is feasible to run a single or set of jobs. This is useful to debug a failing job, or to run an integration test locally. Note that while Github Actions are run in fully virtualized environments, Act runs them in Docker containers. This means that the environment is not exactly the same, but it is close enough to be useful. In practice, we need some tricks to make it work.
Installation
To install Act, follow the instructions specific to your OS in the Act repository.
On the first run, act will ask you to pick the image size. Either choose the
biggest one (it's ~60GiB unzipped) or the medium one. The large one should have
fewer issues with the missing software, but it will take longer to download and
is based on an older Ubuntu base. You can always edit this later in
$HOME/.actrc.
Challenges
Let's consider running an integration test. At the time of writing, the usual workflow looks like this:
- Build Forest daemon and CLI in one job.
- Upload the artifacts to GH.
- In another job, download the artifacts to the test runner.
- Run the integration test.
There are some hurdles to overcome.
sccache
Disabling sccache
We have it everywhere where compilation is involved. It is not installed in the
Act container, so we need to comment all such jobs out. It's not really
mandatory if the continue-on-error is set to true but it does unclutter the
logs.
- name: Setup sccache
  uses: mozilla-actions/sccache-action@v0.0.3
  timeout-minutes: ${{ fromJSON(env.CACHE_TIMEOUT_MINUTES) }}
  continue-on-error: true
A mandatory step is to disable the sccache in the compiler variables. Comments
those overrides out.
RUSTC_WRAPPER: "sccache"
CC: "sccache clang"
CXX: "sccache clang++"
Installing sccache
Alternatively, if debugging sccache itself you can set it up yourself. Create
your own Space in Digital Ocean. Create a .env file and add the following
variables there:
SCCACHE_BUCKET=<my-personal-bucket> SCCACHE_REGION=auto
SCCACHE_ENDPOINT=<my-personal-endpoint>
Grab your Digital Ocean access token and add it to a secrets file. Make sure you don't commit it to the project!
AWS_ACCESS_KEY_ID=<my-personal-access-key-id>
AWS_SECRET_ACCESS_KEY=<my-personal-secret-access-key>
You will be able to use those files with the --env-file and --secret-file
flags.
On top of that, you will need to manually install sccache in the container.
Grab the URL of the latest release from the
sccache repository and put it as
a step in the job that needs it.
wget https://github.com/mozilla/sccache/releases/download/v0.5.3/sccache-v0.5.3-x86_64-unknown-linux-musl.tar.gz
tar -zxf sccache-v0.5.3-x86_64-unknown-linux-musl.tar.gz
sudo mv sccache-v0.5.3-x86_64-unknown-linux-musl/sccache /usr/bin/ && sudo chmod +x /usr/bin/sccache
Uploading/downloading artifacts
If your job uses one of those actions, you can support it with the
--artifact-server-path <temporary-path. Make sure the directory is created
before running the job.
Missing commands
Some commands are not available in the Act container. You can either install
them manually or disable such steps. For example, the lscpu command is not
available.
Missing certificates
It may happen for some downloads. You can disable the step or install the
certificates manually. For example, the rustup command fails because of that.
You can install the certificates with the following command:
apt-get install -y ca-certificates
If this does not work, you can try to install the certificates manually, for example, if there are issues with LetsEncrypt, you try downloading a new root certificate.
wget https://letsencrypt.org/certs/isrgrootx1.pem
mv isrgrootx1.pem /usr/local/share/ca-certificates/isrgrootx1.crt update-ca-certificates --fresh
cargo not in PATH
Add it to the PATH manually before running the command that requires it:
run: |
  export PATH="${HOME}/.cargo/bin:${PATH}"
  make install
Rebuilding Forest from scratch
You can avoid re-building the entire project all the time either by re-using the
container with --reuse or by modifying the job to not depend on it and just
download the artifacts.
Example run
After all the remarks above are addressed, you can run the job locally. For example, to run the integration test for the CLI:
act --secret-file act-secrets.env --env-file act.env -W .github/workflows/forest.yml -j forest-cli-check --artifact-server-path /tmp/artifacts/ --reuse
Assuming you don't want to use sccache and have disabled it, you can run:
act -W .github/workflows/forest.yml -j forest-cli-check --artifact-server-path /tmp/artifacts/ --reuse
Shortened output:
❯ act --secret-file ../forest/act-secrets.env --env-file ../forest/act.env -W .github/workflows/forest.yml -j forest-cli-check --artifact-server-path /tmp/artifacts/  --reuse -q
INFO[0000] Start server on http://192.168.1.10:34567
[Integration tests/Build Ubuntu] 🚀  Start image=catthehacker/ubuntu:act-latest
[Integration tests/Build Ubuntu]   🐳  docker pull image=catthehacker/ubuntu:act-latest platform= username= forcePull=false
[Integration tests/Build Ubuntu]   🐳  docker create image=catthehacker/ubuntu:act-latest platform= entrypoint=["/usr/bin/tail" "-f" "/dev/null"] cmd=[]
[Integration tests/Build Ubuntu]   🐳  docker run image=catthehacker/ubuntu:act-latest platform= entrypoint=["/usr/bin/tail" "-f" "/dev/null"] cmd=[]
[Integration tests/Build Ubuntu]   ☁  git clone 'https://github.com/actions/upload-artifact' # ref=v3
[Integration tests/Build Ubuntu] ⭐ Run Main Show IP
[Integration tests/Build Ubuntu]   🐳  docker exec cmd=[bash --noprofile --norc -e -o pipefail /var/run/act/workflow/0] user= workdir=
[Integration tests/Build Ubuntu]   ✅  Success - Main Show IP
[Integration tests/Build Ubuntu] ⭐ Run Main Checkout Sources
[Integration tests/Build Ubuntu]   🐳  docker cp src=/home/rumcajs/prj/forest/. dst=/home/rumcajs/prj/forest
[Integration tests/Build Ubuntu]   ✅  Success - Main Checkout Sources
[Integration tests/Build Ubuntu] ⭐ Run Main Install Apt Dependencies
[Integration tests/Build Ubuntu]   🐳  docker exec cmd=[bash --noprofile --norc -e -o pipefail /var/run/act/workflow/2] user= workdir=
[Integration tests/Build Ubuntu]   ✅  Success - Main Install Apt Dependencies
[Integration tests/Build Ubuntu] ⭐ Run Main Cargo Install
[Integration tests/Build Ubuntu]   🐳  docker exec cmd=[bash --noprofile --norc -e -o pipefail /var/run/act/workflow/3] user= workdir=
[Integration tests/Build Ubuntu]   ✅  Success - Main Cargo Install
[Integration tests/Build Ubuntu] ⭐ Run Main actions/upload-artifact@v3
[Integration tests/Build Ubuntu]   🐳  docker cp src=/home/rumcajs/.cache/act/actions-upload-artifact@v3/ dst=/var/run/act/actions/actions-upload-artifact@v3/
[Integration tests/Build Ubuntu]   🐳  docker exec cmd=[node /var/run/act/actions/actions-upload-artifact@v3/dist/index.js] user= workdir=
[Integration tests/Build Ubuntu]   ✅  Success - Main actions/upload-artifact@v3
[Integration tests/Build Ubuntu] 🏁  Job succeeded
[Integration tests/Forest CLI checks] 🚀  Start image=catthehacker/ubuntu:act-latest
[Integration tests/Forest CLI checks]   🐳  docker pull image=catthehacker/ubuntu:act-latest platform= username= forcePull=false
[Integration tests/Forest CLI checks]   🐳  docker create image=catthehacker/ubuntu:act-latest platform= entrypoint=["/usr/bin/tail" "-f" "/dev/null"] cmd=[]
[Integration tests/Forest CLI checks]   🐳  docker run image=catthehacker/ubuntu:act-latest platform= entrypoint=["/usr/bin/tail" "-f" "/dev/null"] cmd=[]
[Integration tests/Forest CLI checks]   ☁  git clone 'https://github.com/actions/download-artifact' # ref=v3
[Integration tests/Forest CLI checks] ⭐ Run Main Checkout Sources
[Integration tests/Forest CLI checks]   🐳  docker cp src=/home/rumcajs/prj/forest/. dst=/home/rumcajs/prj/forest
[Integration tests/Forest CLI checks]   ✅  Success - Main Checkout Sources
[Integration tests/Forest CLI checks] ⭐ Run Main actions/download-artifact@v3
[Integration tests/Forest CLI checks]   🐳  docker cp src=/home/rumcajs/.cache/act/actions-download-artifact@v3/ dst=/var/run/act/actions/actions-download-artifact@v3/
[Integration tests/Forest CLI checks]   🐳  docker exec cmd=[node /var/run/act/actions/actions-download-artifact@v3/dist/index.js] user= workdir=
[Integration tests/Forest CLI checks]   ✅  Success - Main actions/download-artifact@v3
[Integration tests/Forest CLI checks]   ⚙  ::set-output:: download-path=/root/.cargo/bin
[Integration tests/Forest CLI checks] ⭐ Run Main Set permissions
[Integration tests/Forest CLI checks]   🐳  docker exec cmd=[bash --noprofile --norc -e -o pipefail /var/run/act/workflow/2] user= workdir=
[Integration tests/Forest CLI checks]   ✅  Success - Main Set permissions
[Integration tests/Forest CLI checks] ⭐ Run Main install CA certificates
[Integration tests/Forest CLI checks]   🐳  docker exec cmd=[bash --noprofile --norc -e -o pipefail /var/run/act/workflow/3] user= workdir=
[Integration tests/Forest CLI checks]   ✅  Success - Main install CA certificates
[Integration tests/Forest CLI checks] ⭐ Run Main Make sure everything is in PATH
[Integration tests/Forest CLI checks]   🐳  docker exec cmd=[bash --noprofile --norc -e -o pipefail /var/run/act/workflow/4] user= workdir=/root/.cargo/bin/
[Integration tests/Forest CLI checks]   ✅  Success - Main Make sure everything is in PATH
[Integration tests/Forest CLI checks] ⭐ Run Main forest-cli check
[Integration tests/Forest CLI checks]   🐳  docker exec cmd=[bash --noprofile --norc -e -o pipefail /var/run/act/workflow/5] user= workdir=
[Integration tests/Forest CLI checks]   ✅  Success - Main forest-cli check
[Integration tests/Forest CLI checks] 🏁  Job succeeded
Caveats
Privileges
By default, act runs jobs as root. Github Actions run under a regular
account (with sudo privileges). Use sudo for installing dependencies, even
if locally it works without it.
Docker BuildKit
It is likely that you have the Docker BuildKit enabled on your system by default. It is not true for GH Actions. To use some of its features, you will need to explicitly put it before other Docker steps:
- name: Set up Docker Buildx
  uses: docker/setup-buildx-action@v3
Testing for Mainnet Compatibility
Forest development can be like hitting a moving target and sometimes Forest falls behind the network. This document should serve as a way to easily identify if Forest can sync all the way up to the network head using a simple step-by-step process.
Prerequisites
Some command-line tools and software is required to follow this guide.
- A fresh copy of the Forest repository that has been built
- Lotus installed
- curl (to download snapshots)
- sha256sum (optional, used to verify snapshot integrity)
Grab a snapshot and run Forest
Refer to the mdbook documentation on how to download a snapshot and run forest
Warning: FileCoin snapshots as of this writing are over 75GB. Verify you have enough space on your system to accommodate these large files.
- Use
make mdbookin Forest's root directory - Open
http://localhost:3000 - Navigate to
2. Basic Usagein the menu on the right - Scroll down to
Forest Import Snapshot Mode
Let Forest sync
This step may take a while. We want Forest to get as far along in the syncing process as it can get. If it syncs up all the way to the network head, CONGRATS! Forest is up to date and on mainnet. Otherwise, Forest is not on mainnet.
If Forest starts to error and can't get past a block while syncing. Make note of which block it is. We can use that block to help debug any potential state mismatches.
Is Forest on the latest network version?
Something easy to check is if Forest is on the latest Filecoin network version. A repository exists where we can see all of the released network versions here. Navigate the codebase to see mention of the latest network upgrade. If a snapshot fails to sync at a certain epoch, it's entirely possible that the snapshot was behind an epoch when a version upgrade started. Grab a new snapshot by referring to the mdbook documentation.
Debugging State Mismatches
Statediffs can only be printed if we import a snapshot containing the stateroot data from Lotus. This means there will not be a pretty statediff if Forest is already synced to the network when the stateroot mismatch happens. By default, snapshots only contain stateroot data for the previous 2000 epochs. So, if you have a statediff at epoch X, download a snapshot for epoch X+100 and tell Forest to re-validate the snapshot from epoch X.
Steps to print a state-diff:
- Note the epoch of the state-root mismatch. State-roots can only be checked for the parents of a tipset so the failing epoch may be 1 higher than you think.
- Download a recent snapshot dated before the failing epoch.
- Import the snapshot into Lotus and sync to HEAD.
- Export a new snapshot 100 epochs after the failing epoch.
- Convert the
.car.zstfile to.forest.car.zstwith:forest-tool snapshot compress {snapshot.car.zst} - Use the
forest-toolbinary to print the state-diff:forest-tool archive diff {snapshot.forest.car.zst} --epoch {failing_epoch}
FVM Traces
Within FVM, we can enable tracing to produce execution traces. Given an offending epoch, we can produce them both for Forest and for Lotus to find mismatches.
To confirm: the execution traces format is not uniform across implementations, so it takes a certain amount of elbow grease to find the differences. Lotus is capable of spitting this out in JSON for nice UX
Dated resources
For more (but dated) information, see this document.
In case of memory leaks, either coming from unsafe libraries or just Forest pushing shamelessly into some collection, it is useful to not guess where the leak happened but to use proper tooling.
HeapTrack
Installation
Either build it with the instructions provided in the repository or download a
ready AppImage, e.g. from
here. You may not want to use
the heaptrack available in your OS packages as it may be a bit outdated.
Preparation
To get the most out of the tool, you may want to add debug information to the binary, regardless if you are running it in release or debug mode.
[profile.dev]
debug = 2

[profile.release]
debug = 2
Usage
You can grab the trace on your host machine or in a VPS (e.g. Digital Ocean Droplet).
Start tracing with heaptrack <normal forest command>, e.g.
heaptrack target/release/forest --encrypt-keystore=false --target-peer-count 50 --chain calibnet --import-snapshot forest_snapshot.car
This will push traces to a file, e.g. heaptrack.forest.12345.gz. The longer
your process will be running, the bigger it will get, so double check your free
space before leaving it overnight.
Now analyze the trace. You can do it after Forest has e.g. crashed due to OOM or
even during its execution. If you were capturing traces in a Droplet, copy the
file to your host, e.g.
scp chainsafe@123.45.66.77:/home/chainsafe/heaptrack.forest.12345.gz ..
Depending on the size of the trace, it may take a while (but there is a nice progress bar so you will know if you can grab a coffee in the meantime).
heaptrack --analyze heaptrack.forest.12345.gz
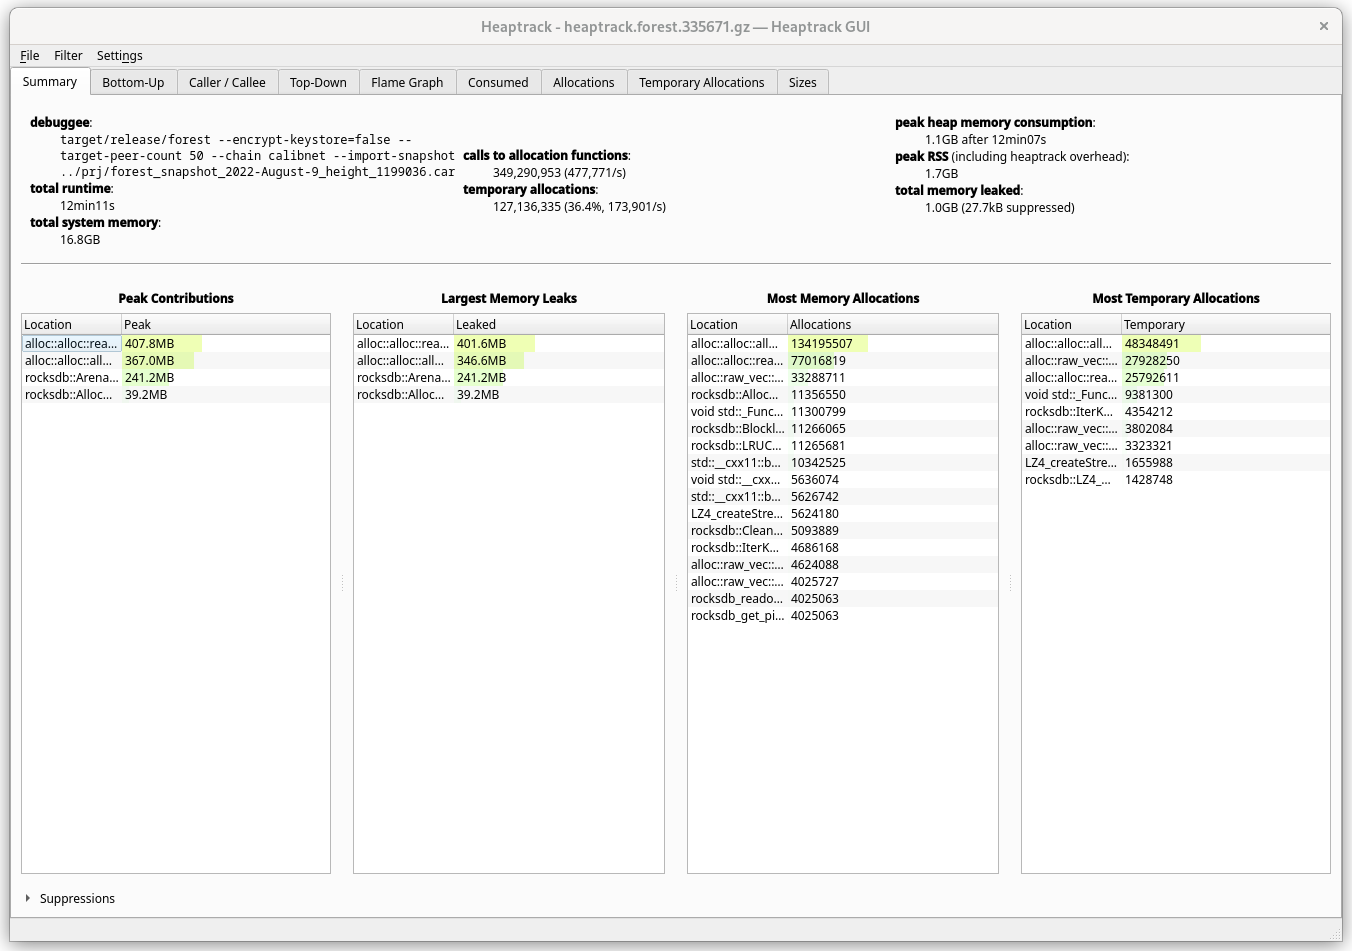
Summary
Here we can see memory usage overview. Keep in mind that leaks here are not necessarily leaks - it's just memory that hasn't been yet freed. A global cache would always show as a leak.
While most of the potential culprits are not necessarily interesting (e.g.
alloc::*) because even a String constructor calls them, we immediately see
that among specific ones, it's the rocksdb that gets into the spotlight.
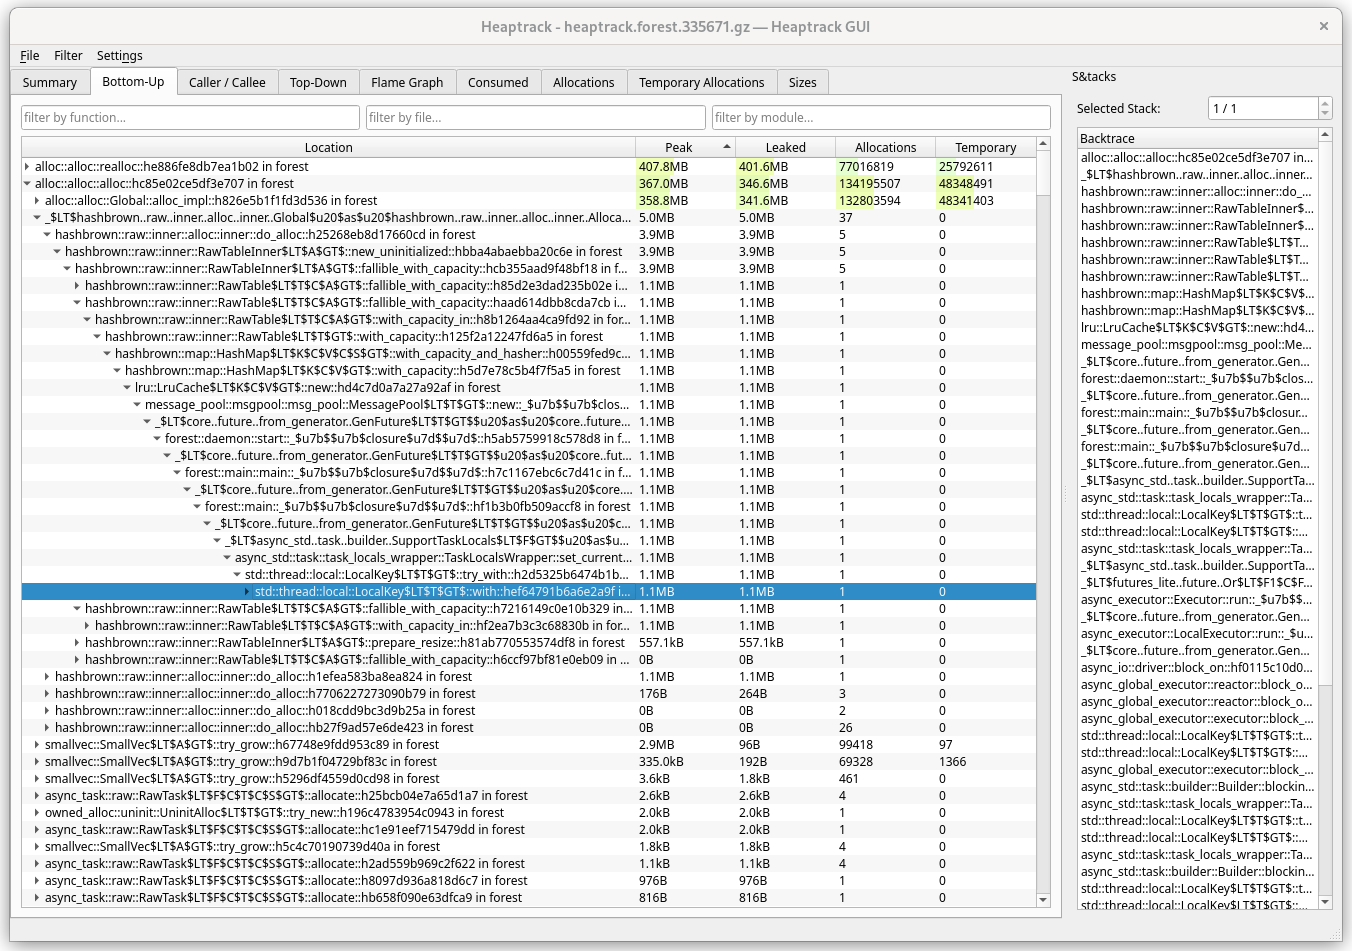
Bottom-up
View in which you see low-level methods first. In such view, the first methods
would almost always be allocator methods, finally unwinding into main.
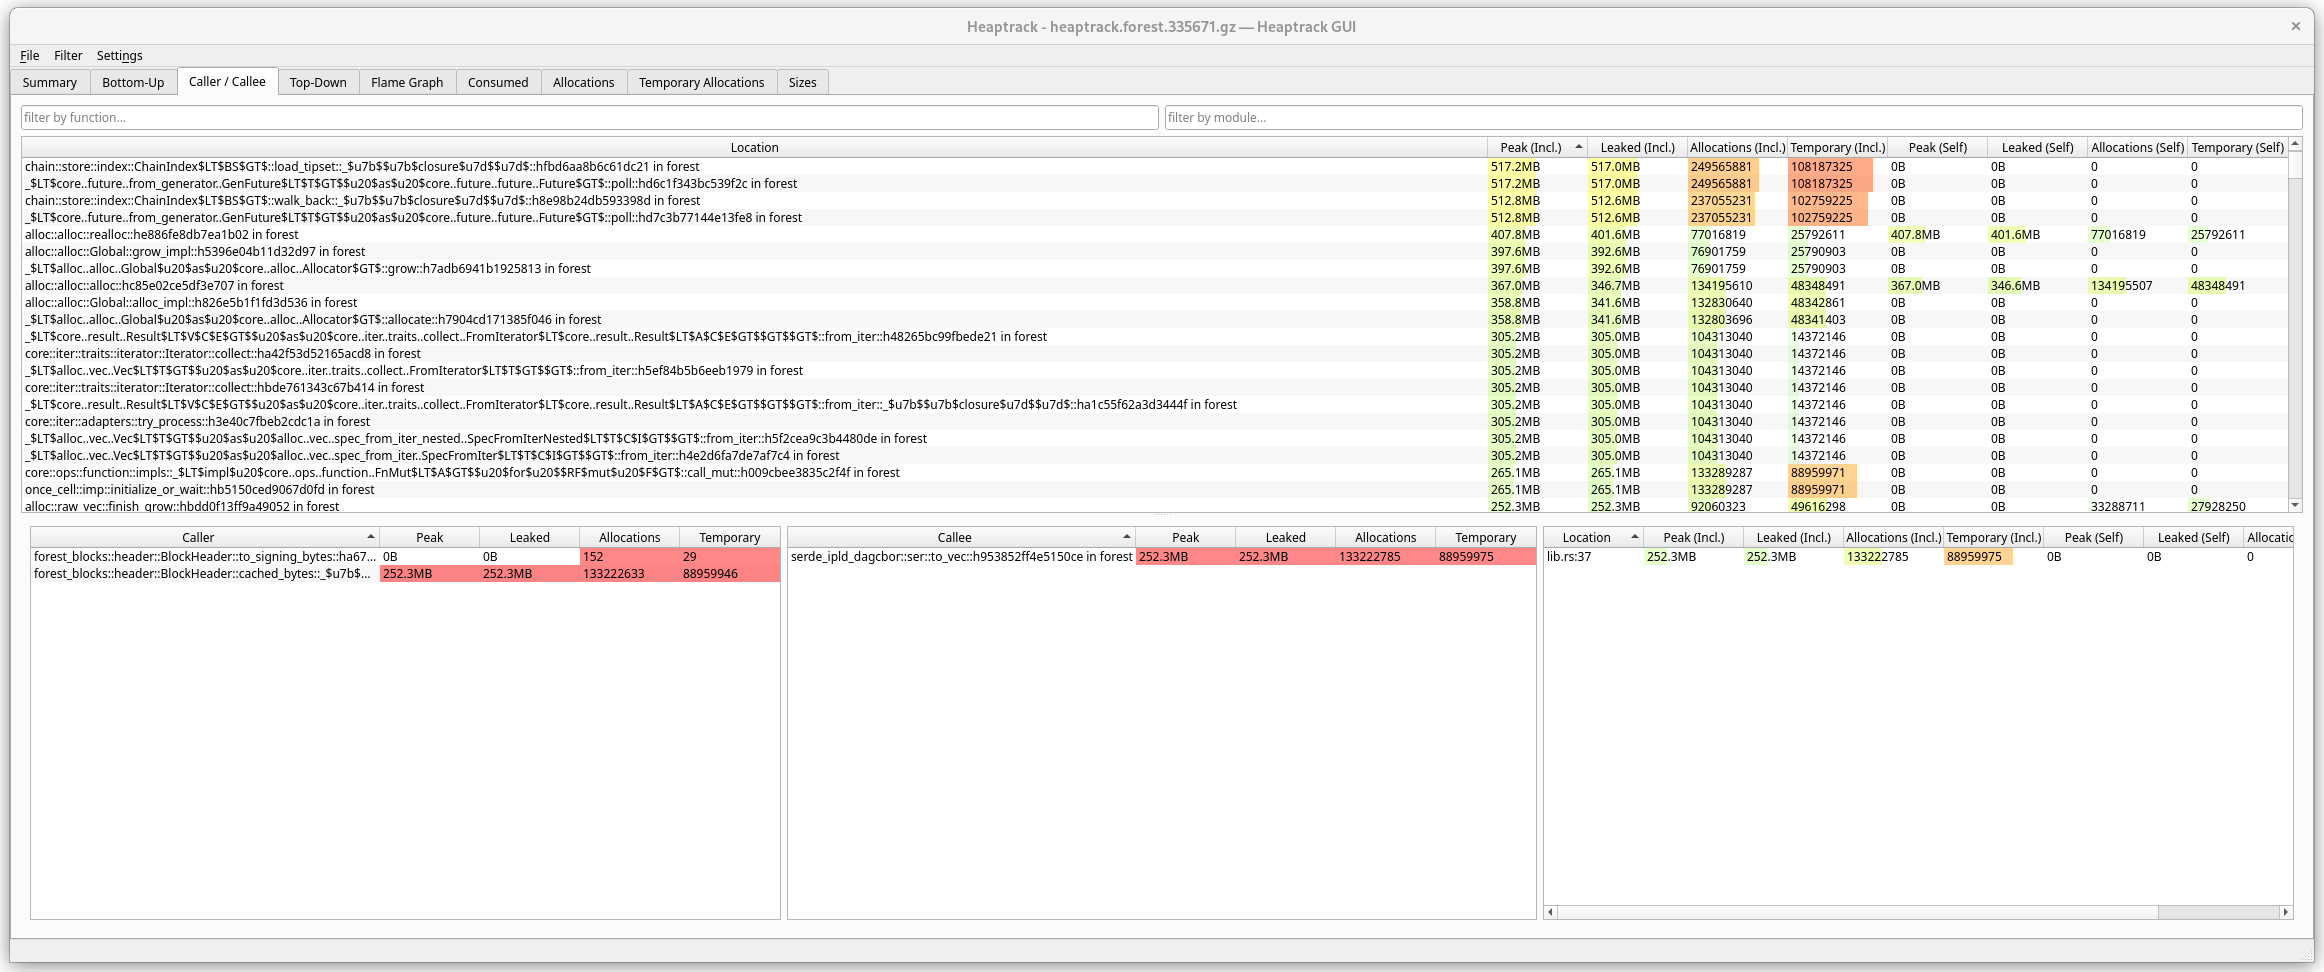
Caller/callee
All the methods called along with their allocations, where one can easily
navigate between their callers and callees, also showing you the location in
code (you can configure heaptrack to take you to that code with
Settings/Code Navigation). Most useful tab when you delve into the details.
Top-down
Basically an inverse of Bottom-up view. High-level methods first, then you can drill down.
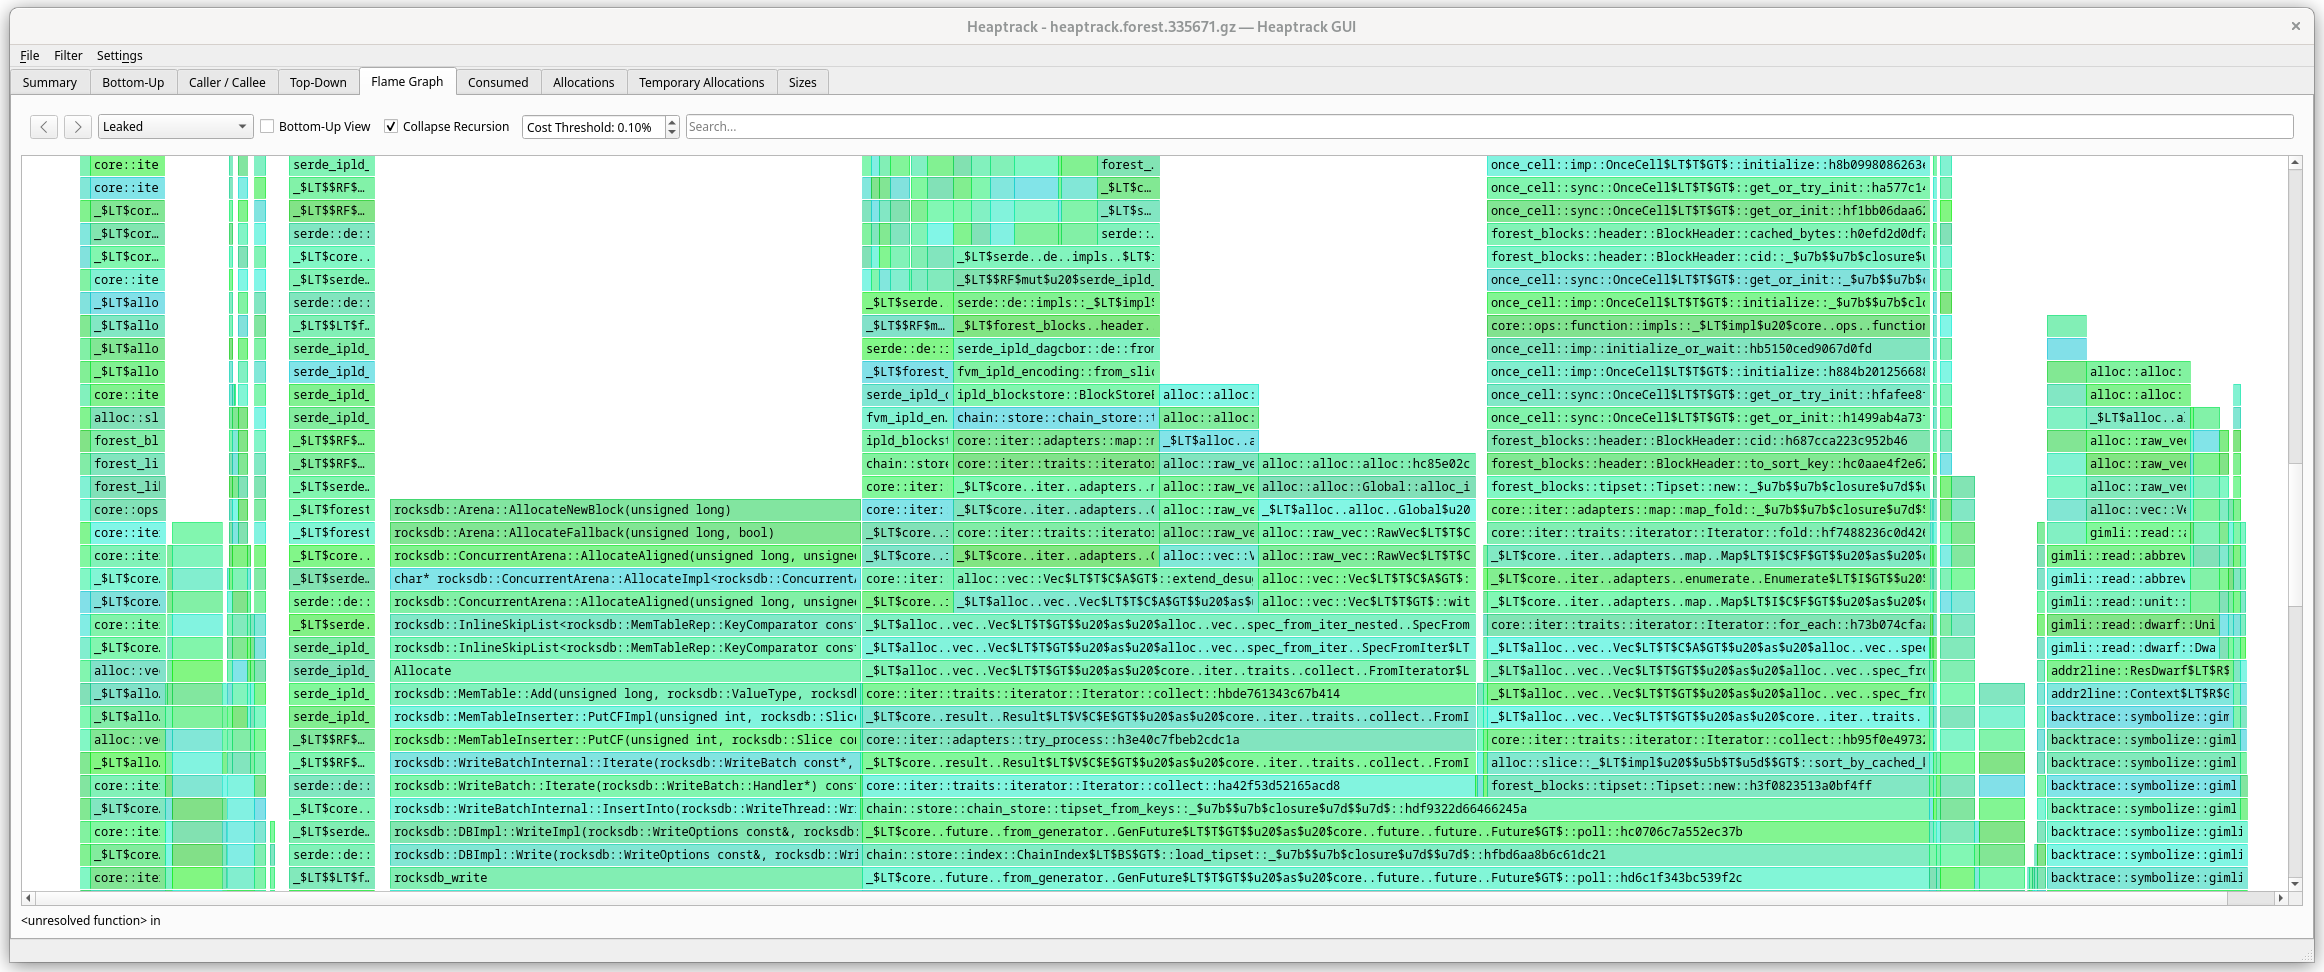
Flamegraph
A graphical form of Bottom-up and Top-Down (you can switch). Helps with visualizing the heavy allocators.
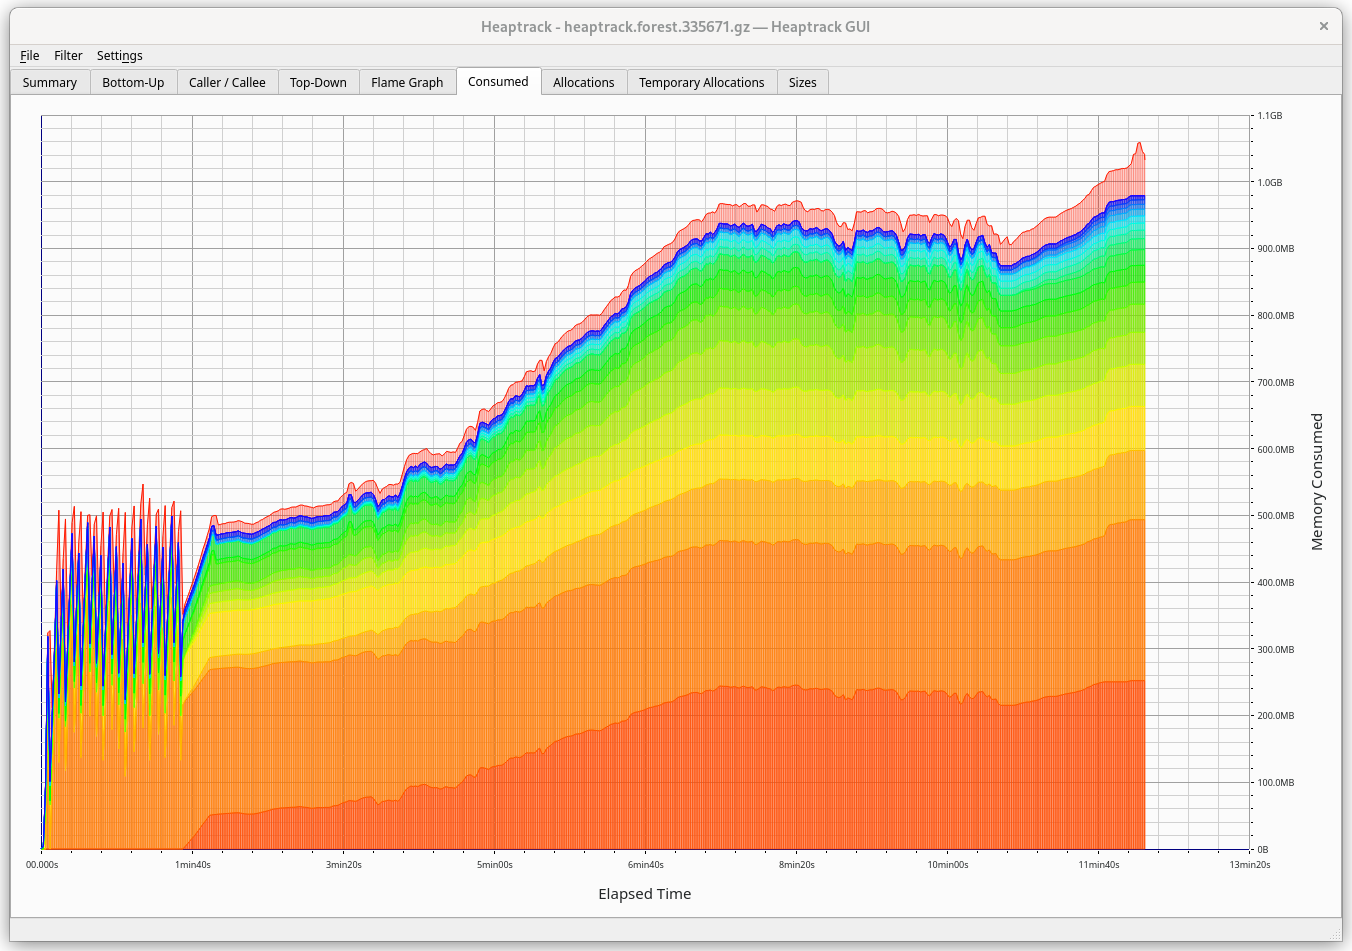
Consumed
Shows the heap memory consumption over time. Here we can notice some patterns, e.g. what happens with memory during snapshot import, then downloading headers and syncing.
Allocations
Shows total number of allocations over time.
Temporary allocations
Shows the number of temporary allocations over time. Temporary allocation is an allocation followed by its deallocation, i.e. there are no other allocations in-between.
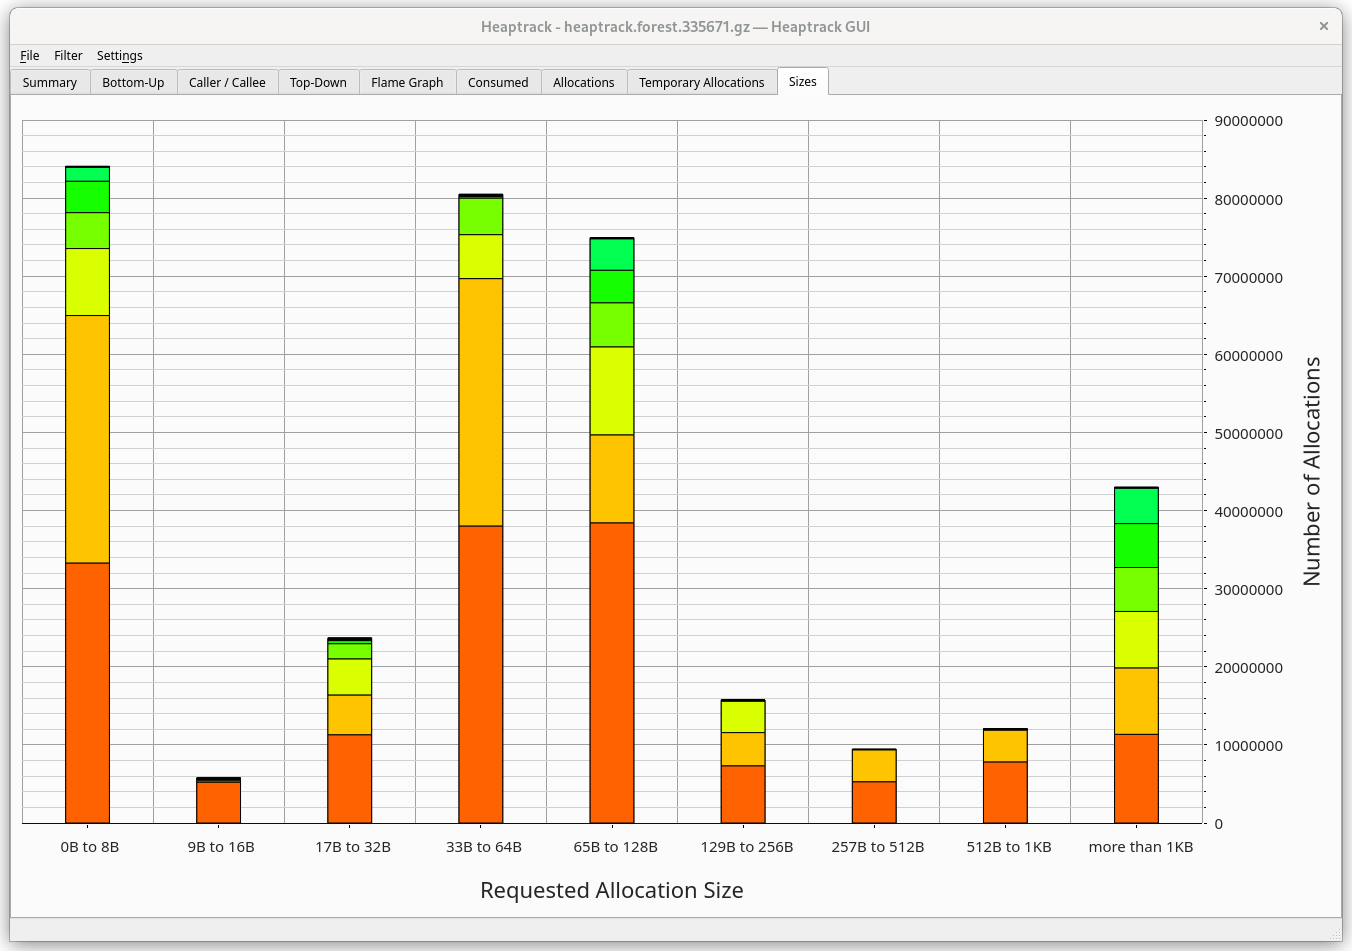
Sizes
This tab will show you the allocation sizes during runtime and their frequency.
If you hover over a bar you will see that e.g. LZ4_createStream (most likely
used by rocksdb) made 5,624,180 allocations, total 92.3G, on average 14.4kB
per allocation.
Miscellaneous
- Keep in mind that running Forest with heaptrack gives a non-negligible memory and CPU overhead. You may not be able to run mainnet node on a 16G machine even if normally it would be fine.
- Optimizations may play tricks on the developer, e.g. inlining functions so
they won't even appear in your trace. If you think a particular method should
have been called but for mysterious reasons it does not appear in the
analysis, you may want to put
#[inline(never)]on top of it. Analyzing a debug build may also be useful, but depending on where the leak happens, it may be too slow. - There is a lot of noise coming from dependencies and standard library. It's useful to mentally filter them out a bit and focus on the biggest culprits in Forest methods. Flamegraph and caller/callee view are the most useful for this.
Release checklist 🛂
Forest doesn't follow a fixed schedule but releases should be expected at least quarterly. A release officer is volunteered for each release, and they are responsible for either following the checklist or, in case of absence, passing the task to a different team member.
Prepare the release
Make a pull request with the following changes:
- Update the CHANGELOG.md file to reflect all changes and preferably write a
small summary about the most notable updates. The changelog should follow the
design philosophy outlined here. Go through the output of
git log <last-tag>..HEADand remember that the audience of the CHANGELOG does not have intimate knowledge of the Forest code-base. All the changed/updated/removed features should be reasonably understandable to an end-user. - Update the version of the forest crate (and any others, if applicable) to
be released. Make sure that the updated files do not contain a
[patch.crates-io]section, otherwise you won't be able to make a release on crates.io. - Run the manual tests steps outlined in the TEST_PLAN.md. Caveat: Right now there are no manual test steps so this step can be skipped.
- Make sure to run
cargo publish --dry-runand include theCargo.lockcrate version change in the release.
Release on crates.io
- Publish the new crate on crates.io according to the manual.
Release on GitHub
- Create a new release. Click on
Choose a tagbutton and create a new one. The tag must start with a lowercasev, e.g.,v0.11.0. Follow the title convention of the previous releases, and write a small summary of the release (similar or identical to the summary in the CHANGELOG.md file). Add additional, detailed notes withGenerate release notesbutton. - Verify that the new release contains assets for both Linux and macOS (the assets are automatically generated and should show up after 30 minutes to an hour).
- 🔁 If it's a new stable release (and not a backport), tag the version as
latestwith the retag action. - Verify that the new release is available in the GitHub Container Registry. Use
docker pull ghcr.io/chainsafe/forest:<version>. Verify the tags in the packages list.
It's unclear how we can support migrations without adding a lot of code complexity. This document is meant to shed light on the matter and illuminate a sustainable path forward. As a start we will consider a migration going from nv15 to nv16.
Migration path investigation from nv15 to nv16
Findings
- Actor IDs definitely changed
For following actors only their CID have changed:
- init
- cron
- account
- power
- miner
- paymentchannel
- multisig
- reward
- verifiedregistry
Those are just simple code migration.
For system and market actors there's both code and state changes. That's why there is dedicated logic for their migration.
The system actor need to update the state tree with its new state that holds now
the ManifestData CID.
For the market actor more work is involved to upgrade actor state due to support for UTF-8 string label encoding in deal proposals and pending proposals (see FIP-0027).
- Some gas calculations changed?
I don't think we are concerned by this. Gas metering can change at a given protocol upgrade for one or many actors but the impact is irrelevant as it doesn't modify blockchain data structures. Gas calculations should only impact code and in our case the nv16 ref-fvm is already supporting the new gas changes.
- drand calculation changed?
Ditto.
- What else changed?
Nothing else as far I can see.
Open questions
-
pre-migration framework + caching: how much do we need a similar approach in Forest? Are there other alternatives? We can definitely skip this part at first. For information the old nv12 state migration in forest took around 13-15 secs.
-
Seen in Lotus:
UpgradeRefuelHeight. What's Refuel for? -
Migration logic is in spec-actors (go actors), what the future of this given clients moved to builtin-actors (rust actors) and ref-fvm? In an ideal world we might want a shared migration logic.
-
Implement Lite migration?
should allow for easy upgrades if actors code needs to change but state does not. Example provided above the function to perform all the migration duties. Check actors_version_checklist.md for the rest of the steps.
-
What are non-deferred actors in the context of a migration?
-
The
migrationJobResultstruct is using astates7actor instead of astates8one (in go spec-actors). Typo or are there some good reasons?
Changes rough proposal
To support nv15 to nv16 migration we need to:
- Make forest sync again on nv15 and be able to support multiple network versions.
- Understand existing forest migration framework (used in the past for nv12 migration). Can we reuse most of the code as is?
- Implementation of the nv16 migration logic (replicating same logic as in spec-actors).
- Implementation of unit tests covering this migration.
- Implementation of a migration schedule that will select the right migration path.
- Test migration using the exported calibnet and mainnet snapshots and respectively measure the elapsed time and memory usage.
Test snapshots
For testing a calibnet migration two snapshots have been exported with Lotus:
- lotus_snapshot_2022-Aug-5_height_1044460.car
- lotus_snapshot_2022-Aug-5_height_1044659.car
They are respectively exported 200 and 1 epochs before the Skyr upgrade (the 200 version could be useful if we decide to implement a pre-migration like in Lotus).
For testing a mainnet migration, one snapshot has been retrieved from Protocol Labs s3 bucket using the lily-shed util:
- minimal_finality_stateroots_1955760_2022-07-05_00-00-00.car
This one is 4560 epochs before. If needed we can extract closer snapshots later.
Those snapshots have been uploaded to our Digital Ocean Spaces.
Additional resources
what changed between versions is maintained in the
tpm repo,
e.g. all the changes in
NV15 -> NV16
State migration guide ⏩
This guide is intended to help to implement new state migration in the future. It will be based on the current state migration implementation for NV18 and NV19.
State migration requirements
- The proper actor bundle is released for at least the test network. It should be available on the actor bundles repository. You can verify which upgrade needs which bundle in the network upgrade matrix.
- The state migration should be implemented in the Go library. This is the source of truth for the state migration. Also, we should carefully analyze the FIPs and implement the migration based on them. In case of doubt, we should always consider the FIPs as the source of truth and reach out to the Lotus team if we find potential issues in their implementation.
Development
Import the actor bundle
The first step is to import the actor bundle into Forest. This is done by:
- adding the bundle cid to the
HeightInfosstruct in the network definitions files (e.g., calibnet).
#![allow(unused)]
fn main() {
HeightInfo {
    height: Height::Hygge,
    epoch: 322_354,
    bundle: Some(Cid::try_from("bafy2bzaced25ta3j6ygs34roprilbtb3f6mxifyfnm7z7ndquaruxzdq3y7lo").unwrap()),
}
}
-
adding the bundle manifest cid and url to the
ACTOR_BUNDLESin thesrc/networks/actors_bundle.rs. -
ensuring the bundle is mirrored in Forest's DO space under
https://forest-snapshots.fra1.cdn.digitaloceanspaces.com/actors/.
#![allow(unused)]
fn main() {
"bafy2bzacecnhaiwcrpyjvzl4uv4q3jzoif26okl3m66q3cijp3dfwlcxwztwo" @ "v11.0.0" for "mainnet",
},
}
Implement the migration
The next step is to implement the migration itself. In this guide, we will take
the translate Go code into Rust approach. It's not the cleanest way to do it,
but it's the easiest. Note that the Forest state migration design is not the
same as the Lotus one (we tend to avoid code duplications), so we must be
careful when translating the code.
Create the migration module
Create the nvXX migration module in the state migration module. A valid approach is just to copy-paste the previous migration module and modify it accordingly. The files that will most likely be present:
mod.rs: here we bundle our migration modules and export the final migration function, defining the state types before and after migration, implementing the common system migrator and the verifiermigration.rs: the heart of the migration. Here we add the migration logic for each actor. Its Go equivalent is the top.go, in case of NV18,
We will most likely need as many custom migrators as there are in the Go implementation. In other terms, if you see that the Go migration contains:
eam.go- Ethereum Account Manager migration,init.go- Init actor migration,system.go- System actor migration,
Then our implementation will need to define those as well.
The actual migration
This part will largely depend on the complexity of the network upgrade itself.
The goal is to translate the MigrateStateTree method from
Go
to the add_nvXX_migrations in the migration.rs file. The
add_nvXX_migrations method is responsible for adding all the migrations that
are needed for the network upgrade and the logic in between. Note that the
Forest version is much simpler as it doesn't contain the migration engine
(implemented in the base module).
The first thing to do is to get the current system actor state and the current manifest. Then we will map the old actor codes to the new ones.
#![allow(unused)]
fn main() {
let state_tree = StateTree::new_from_root(store.clone(), state)?;
let system_actor = state_tree
    .get_actor(&Address::new_id(0))?
    .ok_or_else(|| anyhow!("system actor not found"))?;

let system_actor_state = store
    .get_cbor::<SystemStateOld>(&system_actor.state)?
    .ok_or_else(|| anyhow!("system actor state not found"))?;

let current_manifest = Manifest::load_with_actors(&store, &system_actor_state.builtin_actors, 1)?;

let new_manifest = Manifest::load(&store, &new_manifest, version)?;

}
⚠️ Stay vigilant! The StateTree versioning is independent of the network and
actor versioning. At the time of writing, the following holds:
StateTreeVersion0- Actors version < v2StateTreeVersion1- Actors version v2StateTreeVersion2- Actors version v3StateTreeVersion3- Actors version v4StateTreeVersion4- Actors version v5 up to v9StateTreeVersion5- Actors version v10 and above These are not compatible with each other and when using a new FVM, we can only use the latest one.
For actors that don't need any state migration, we can use the nil_migrator.
#![allow(unused)]
fn main() {
for (name, code) in current_manifest.builtin_actors() {
    let new_code = new_manifest.code_by_name(name)?;
    self.add_migrator(*code, nil_migrator(*new_code));
}
}
For each actor with non-trivial migration logic, we add the migration function.
For example, for the init actor, we have:
#![allow(unused)]
fn main() {
self.add_migrator(
  *current_manifest.get_init_code(),
  init::init_migrator(*new_manifest.get_init_code()),
);
}
and we define the init_migrator in a separate module. This logic may include
setting some defaults on the new fields, changing the current ones to an
upgraded version and so on.
Verifier
An optional (but recommended) piece of code that performs some sanity checks on the state migration definition. At the time of writing, it checks that all builtin actors are assigned a migration function.
#![allow(unused)]
fn main() {
let verifier = Arc::new(Verifier::default());
}
Post-migration actions
Some code, like creating an entirely new actor (in the case of NV18 creating EAM and Ethereum Account actors), needs to be executed post-migration. This is done in the post-migration actions.
#![allow(unused)]
fn main() {
self.add_post_migrator(Arc::new(EamPostMigrator));

self.add_post_migrator(Arc::new(EthAccountPostMigrator));
}
Creating the migration object and running it
We take all the migrations that we have defined previously, all the post-migration actions, and create the migration object.
#![allow(unused)]
fn main() {
let mut migration = StateMigration::<DB>::new(Some(verifier), post_migration_actions);
migration.add_nv18_migrations(blockstore.clone(), state, &new_manifest_cid)?;

let actors_in = StateTree::new_from_root(blockstore.clone(), state)?;
let actors_out = StateTree::new(blockstore.clone(), StateTreeVersion::V5)?;
let new_state =
migration.migrate_state_tree(blockstore.clone(), epoch, actors_in, actors_out)?;

Ok(new_state)
}
The new state is the result of the migration.
Use the migration
After completing the migration, we need to invoke it at the proper height. This
is done in the handle_state_migrations method in the
state manager.
This step could be potentially done automatically in the future.
Testing
We currently lack a framework for properly testing the network upgrades before they actually happen. This should change in the future.
For now, we can do it using a snapshot generated after the network upgrade, e.g., 100 epochs after and validating previous epochs which should include the upgrade height.
forest --chain calibnet --encrypt-keystore false --halt-after-import --height=-200 --import-snapshot <SNAPSHOT>
Test first development
When the Go migration code to translate from is large(e.g. nv17), it makes development much easier to be able to attach debuggers. Follow below steps to create simple unit tests for both Rust and Go with real calibnet or mainnet data and attach debuggers when needed during development.
-
Get input state cid. Run
forest --chain calibnet --encrypt-keystore false --halt-after-import --height=-200 --import-snapshot <SNAPSHOT>, the input state cid will be in the failure messagesPrevious state: <CID>. And the expected output state cid can be found in state mismatch error messages. -
Export input state by running
forest-cli state fetch <PREVIOUS_STATE_CID> <PREVIOUS_STATE_CID>.car -
Compress the car file by running
zstd <PREVIOUS_STATE_CID>.car -
Move the compressed car file to data folder
src/state_migration/tests/data -
Create a Rust test in
src/state_migration/tests/mod.rs. Note: the output CID does not need to be correct to attach a debugger during development.Example test for nv17 on calibnet:
#![allow(unused)] fn main() { #[tokio::test] async fn test_nv17_state_migration_calibnet() -> Result<()> { test_state_migration( Height::Shark, NetworkChain::Calibnet, Cid::from_str("bafy2bzacedxtdhqjsrw2twioyaeomdk4z7umhgfv36vzrrotjb4woutphqgyg")?, Cid::from_str("bafy2bzacecrejypa2rqdh3geg2u3qdqdrejrfqvh2ykqcrnyhleehpiynh4k4")?, ) .await } } -
Create a Go test in
src/state_migration/go-test/state_migration_test.go. Note:newManifestCidis the bundle CID, epoch is the height that migration happens. Instruction on debugging Go code in VS Code.Example test for nv17 on calibnet:
func TestStateMigrationNV17(t *testing.T) {
  startRoot := cid.MustParse("bafy2bzacedxtdhqjsrw2twioyaeomdk4z7umhgfv36vzrrotjb4woutphqgyg")
  newManifestCid := cid.MustParse("bafy2bzacedbedgynklc4dgpyxippkxmba2mgtw7ecntoneclsvvl4klqwuyyy")
  epoch := abi.ChainEpoch(16800)

  bs := migration9Test.NewSyncBlockStoreInMemory()
  ctx := context.Background()

  loadCar(t, ctx, bs, fmt.Sprintf("%s/.local/share/forest/bundles/calibnet/bundle_Shark.car", os.Getenv("HOME")))
  loadCompressedCar(t, ctx, bs, fmt.Sprintf("../data/%s.car.zst", startRoot))

  runStateMigration(t, ctx, cbor.NewCborStore(bs), startRoot, newManifestCid, epoch)
}
Performance considerations
Mainnet upgrades can take a long time even on a powerful machine, due to the size of the state. It's useful to test beforehand how long (roughly) will a migration take to better prepare ourselves and signal potential issues to other implementation teams.
One trick to test this is to:
- download any recent mainnet snapshot,
- change the schedule for the migration to happen 10 epochs before the snapshot's height,
- import the snapshot (on a clean database) and validate the migration epoch (or a range including that epoch)
For example, with the scheduled migration at 3411547, we can run:
forest --encrypt-keystore false --import-snapshot forest_snapshot_mainnet_2023-11-22_height_3411557.forest.car.zst --height=-20
While the migration itself should succeed, there will be a state mismatch afterwards. This is not an issue.
2023-12-05T15:46:37.988136Z  INFO forest_filecoin::state_migration: State migration at height Watermelon(epoch 3411547) was successful, Previous state: bafy2bzacedqswtcnhub5ea6upcjp4s7ghba5lgxri7ckezgsdxbkgnh6oyz3w, new state: bafy2bzacecxvz7jl3pt3ki4cirp4arfbmdxxcdb2ni4mzhkbbxqaug5z747gu, new state actors: bafy2bzaceb53kdtubm74czvthzah5inpejrrw7tdueajuhp3n7pbirzjwpqok. Took: 349.9679s.
2023-12-05T15:46:42.438174Z ERROR forest_filecoin::state_manager: state mismatch height=3411549 expected_state=Cid(bafy2bzacecr6ll3w6kb5cyvcsl2e5z6wqrbhaxntzaabkbqikmhuj5a7ukbxk) expected_receipt=Cid(bafy2bzacebhp2zlhpabxgquiht7cu5rqug5sxtxyfadkiijdpaxmcrhdyfs3s) actual_state=Cid(bafy2bzacecjb4tc4hub2yytxdsr7kpozdabufgsvdixqkkllg3yqv7zxujs2g) actual_receipt=Cid(bafy2bzaceaqdlwllmddokd5izwvf7isqlzglueqcw62ttyn5j3nx2hzk4ecwg)
While the resulting state might be incorrect (not matching what Lotus calculated), at least we verify that the migration isn't causing OOMs and takes reasonable amount of time.
Future considerations
- Grab the actor bundles from the IPFS. This would make Forest less dependent on the Github infrastructure. Issue #2765
- Consider pre-migrations as Lotus does. It is not needed at the moment (the mainnet upgrade takes several seconds at most) but may become a bottleneck if the migration is too heavy.
State migration spike 🛂
What is state migration?
State migration is a process where the StateTree contents are transformed from
an older form to a newer form. Certain Actors may need to be created or migrated
as well.
Why do we need to migrate?
Migration is required when the structure of the state changes. This happens when new fields are added or existing ones are modified. Migration is not required in case of new behaviour.
In case of NV18, the StateTree changed from version 4 to version 5. See
https://github.com/filecoin-project/ref-fvm/pull/1062
What to upgrade?
We need to upgrade the StateTree which is represented as
HAMT<Cid, ActorState> to the latest version.
On top of that, we need to migrate certain actors. In the case of NV18 upgrade, it's the init and system actor. EAM actor needs to be created.
When to upgrade?
There is a separate upgrade schedule for each network. In Lotus, it is defined in upgrades.go. In Venus, in fork.go which has the same structure.
For the case of NV18, it is defined as
Height:    build.UpgradeHyggeHeight,
Network:   network.Version18,
Migration: UpgradeActorsV10,
PreMigrations: []stmgr.PreMigration{{
	PreMigration:    PreUpgradeActorsV10,
	StartWithin:     60,
	DontStartWithin: 10,
	StopWithin:      5,
}},
Expensive: true,
How to upgrade?
Iterate over the state of each actor at the given epoch and write the new state along with any specific changes to the respective state. This involves iterating over each of the HAMT nodes storing the state and writing them to the database.
Lotus upgrade method
and the
module
dedicated to Actors v10 migration. The core logic is
here.
The same module is used by Venus.
Forks migrations: handled by fork.go entities.
Where to upgrade?
It should be done most likely in the apply blocks method.
// handle state forks
// XXX: The state tree
pstate, err = sm.HandleStateForks(ctx, pstate, i, em, ts)
if err != nil {
	return cid.Undef, cid.Undef, xerrors.Errorf("error handling state forks: %w", err)
}
In Forest we already have a hint from the past:
#![allow(unused)]
fn main() {
if epoch_i == turbo_height {
    todo!("cannot migrate state when using FVM - see https://github.com/ChainSafe/forest/issues/1454 for updates");
}
}
We can try with something simplistic to get it running, it's not an issue. Afterwards we can implement a proper schedule with functors.
Challenges
- Doing the state migration efficiently; we need to traverse every entry in the state trie. Lotus does pre-migration which are filling relevant caches to speed up the eventual full migration at the upgrade epoch. We might need to do something like this as well; it might not be necessary for the first iteration - depends on how performant the migration process would be in the Forest itself.
- No test network. While we can use existing snapshots from before the upgrade to test state migration, it is not sustainable if we want to continuously support calibration network. We either require a local devnet for testing migration before they actually happen on real networks or we can try supporting more bleeding-edge networks. The former approach is more solid, but the latter might be easier to implement at first (and would give Forest more testnets support which is always welcome).
- There may be forks, so we probably need to keep the pre-migration and post-migration state in two caches for some back and forths. This in Lotus is handled with HandleStateForks.
- For EAM Actor we may need some Ethereum methods we have not yet implemented.
Perhaps what
builtin-actorsandref-fvmexpose will be enough.
Current Forest implementation
For the moment Forest does not support migrations. The code that was meant for this is not used at the moment. Most probably we will be able to utilise it.
Plan
We should start by adding an nv18 to the state migration
crate,
along the lines of the
Go equivalent.
Most likely this would mean adding some missing structures, related to the v10
actors (Ethereum ones).
Then try to plug it in apply_blocks. This may work for calibration network. Afterwards, we will most likely need to iterate to achieve acceptable performance for mainnet. Some ideas on how to achieve this can be taken from Lotus/Venus, e.g., pre-migration caching.
Sources
- Rahul's article: https://hackmd.io/@tbdrqGmwSXiPjxgteK3hMg/r1D6cVM_u
- Lotus codebase - https://github.com/filecoin-project/lotus
- Venus codebase - https://github.com/filecoin-project/venus
Forest Test Plan
Version: 1.0
Author: David Himmelstrup
Date updated: 2022-11-14
Test objective:
The Filecoin specification is complex and changes rapidly over time. To manage this complexity, Forest uses a rigorous testing framework, starting with individual functions and ending with complete end-to-end validation. The goals, in descending order of priority, are:
- Regression detection. If Forest can no longer connect to mainnet or if any of its features break, the development team should be automatically notified.
- No institutional/expert knowledge required. Developers can work on a Forest subsystem without worrying about accidentally breaking a different subsystem.
- Bug identification. If something break, the test data should narrow down the location of the issue.
Scope of testing definition:
Forest testing is multifaceted and layered. The testing pipeline looks like this:
- Unit tests for library functions. Example: parsing a network version fails for garbled input.
- Unit tests for CLI programs. Example:
forest-cli dumpproduces a valid configuration. - Property tests. Example:
deserialize ∘ serialize = idfor all custom formats. - Network synchronization. PRs are checked against the calibration network, the main branch is checked against the main network.
- End-to-end feature tests. Example: Network snapshots are generated daily and hosted publicly.
- Link checking. API documentation and markdown files are checked for dead links.
- Spell checking. API documentation is checked for spelling errors and typos.
All testing is automated and there are no additional manual checks required for releases.
Resources / Roles & Responsibilities:
Testing is a team effort and everyone is expected to add unit tests, property tests, or integration tests as part of their PR contributions.
Tools description:
- Bug tracker: https://github.com/ChainSafe/forest/issues
- Test Automation tools: nextest, quickcheck
- Languages: Rust
- CI/CD: GitHub Actions
- Version control: Git
Deliverables:
The only deliverable is a green checkmark. Either all tests pass and a PR may be merged into the main branch or something is not up to spec and the PR is blocked.
Test Environment & CI
Short-running tests are executed via GitHub Actions on Linux and MacOS. Long-running tests are run on dedicated testing servers.
The services on the dedicated servers are described here: https://github.com/ChainSafe/forest-iac
In short, the long-running tests are executed in dockerized environments with some running one per day and some running on every commit to the main Forest branch. At the moment, the tests are run on DigitalOcean but they can be run from anywhere. Feedback is reported to ChainSafe's Slack server and artifacts are uploaded to DigitalOcean Spaces.
Test Data:
No private or confidential data is involved in testing. Everything is public.
Bug template:
Bug report template is available on GitHub: https://github.com/ChainSafe/forest/blob/main/.github/ISSUE_TEMPLATE/bug_report.md
The template is applied automatically when bugs are reported through GitHub.
Risk & Issues:
- We depend on the calibration network for testing. If this network is down, our testing capabilities are degraded.
- We depend on GitHub Actions for testing. If GitHub Action is unavailable, testing will be degraded.
- Testing against mainnet is effective for discovering issues, but not great for identifying root causes. Finding bugs before syncing to mainnet is always to be preferred.
Cleaning
rm -rf ~/.genesis-sectors/ ~/.lotus-local-net/ ~/.lotus-miner-local-net/
Running the node:
export LOTUS_PATH=~/.lotus-local-net
export LOTUS_MINER_PATH=~/.lotus-miner-local-net
export LOTUS_SKIP_GENESIS_CHECK=_yes_
export CGO_CFLAGS_ALLOW="-D__BLST_PORTABLE__"
export CGO_CFLAGS="-D__BLST_PORTABLE__"
# For MacOS: LIBRARY_PATH=/opt/homebrew/Cellar/hwloc/2.9.1/lib
make 2k
./lotus fetch-params 2048
./lotus-seed pre-seal --sector-size 2KiB --num-sectors 2
./lotus-seed genesis new localnet.json
./lotus-seed genesis add-miner localnet.json ~/.genesis-sectors/pre-seal-t01000.json
./lotus daemon --lotus-make-genesis=devgen.car --genesis-template=localnet.json --bootstrap=false
# Keep this terminal open
Running the miner:
export LOTUS_PATH=~/.lotus-local-net
export LOTUS_MINER_PATH=~/.lotus-miner-local-net
export LOTUS_SKIP_GENESIS_CHECK=_yes_
export CGO_CFLAGS_ALLOW="-D__BLST_PORTABLE__"
export CGO_CFLAGS="-D__BLST_PORTABLE__"
./lotus wallet import --as-default ~/.genesis-sectors/pre-seal-t01000.key
./lotus-miner init --genesis-miner --actor=t01000 --sector-size=2KiB --pre-sealed-sectors=~/.genesis-sectors --pre-sealed-metadata=~/.genesis-sectors/pre-seal-t01000.json --nosync
./lotus-miner run --nosync
# Keep this terminal open
Helpers:
./lotus-miner info
./lotus-miner sectors list
Send data to miner:
./lotus client query-ask t01000
./lotus client import LICENSE-APACHE
./lotus client deal
./lotus client retrieve [CID from import] test.txt # data has to be on chain first
Get data on chain:
./lotus-miner storage-deals pending-publish --publish-now
./lotus-miner sectors seal 2
./lotus-miner sectors batching precommit --publish-now
./lotus-miner sectors batching commit --publish-now
Retrieve:
./lotus client local
./lotus client retrieve --provider t01000 [CID from import] outputfile.txt
Filecoin Graph
A Filecoin blockchain is a single IPLD DAG, usually encoded as CBOR. The roots of this graph are called tipsets. Snapshot files (using the CARv1 file format) contain every block header until genesis and (usually) 2000 recent tipsets. These tipsets (together with additional data downloaded from the p2p network) are sufficient to synchronize with a Filecoin blockchain.
As of writing, the size of the entire Filecoin blockchain graph for mainnet is
at 14TiB.
Tipsets
A tipset is a set of blocks that were mined at the same time (e.i. same epoch). Filecoin uses a randomized lottery (with the number of tickets depending on your storage capacity) to determine who is allowed to mine blocks (and thus get rewards). The number of winners per epoch is 5 on average but may be zero or any other number.
Tipsets are identified by the set of blocks they contain. Thus, a null tipset
cannot be uniquely identified as it has no blocks. When this happens, blocks
refer to the nearest non-null parent. The picture below shows four tipsets at
epoch N, N-1, N-2 and N-3. The N-2 tipset is a null tipset and cannot
be referenced. As such, blocks in tipset N-1 refer directly to the N-3
grand-parent:

Blocks
A block header primarily contains a timestamp, an epoch, a link to the parent tipset, a link to the state-tree of the parent, and a link to a set of messages (i.e., transactions). Blocks are block headers combined with messages. The Filecoin p2p network gives access to all block headers but not all state-trees and messages.
State trees and mesages
State trees are persistent data structures built primarily with persistent hashmaps (HAMT) and persistent vectors (AMT). The state tree for a given epoch will share a lot of nodes with the state tree for the preceding epoch.
Messages are transactions that modify state trees.
Most Filecoin nodes run in lite-mode and only store the most recent state trees and messages. Only archival nodes have access to the full Filecoin graph (all messages, all state trees, all blocks, etc).
Specification
Forest archive
Forest aims at providing data for the following use-cases:
- Quickly syncing to HEAD. This requires up-to-date (less than a day old) snapshots.
- Running archival nodes for unique data. State trees can be re-generated given enough compute time but block headers and messages cannot. The full block history should be available and easily accessible.
- Accessing state-trees at arbitrary epochs. Storage providers are often interested in querying the state as it was months or years ago. There should be an efficient way of accessing ranges of epoch without downloading the entire graph.
- Parallel validation. The Filecoin consensus rules have changed over time, and the only way to guarantee compliance is to validate all the historical tipsets. For feasibility, this should be done in parallel.
Buckets
/{network}/latest: Recent snapshots. Old files may be deleted after, say, 72 hours./{network}/snapshots: Historical snapshots at regular epoch intervals. One snapshot every 2880*7 epochs./{network}/diffs: Diff files at regular intervals. Diffs are not complete snapshots and only contain the new key-value pairs since the previous diff./{network}/diffs/roll-up: Union of diffs over a longer time period. Roll-up period could be 6 months (2880*30*6 epochs). These roll-ups do not contain any unique information; they are a more convenient way of downloading diffs./{network}/spine: Diff files containing only blocks and messages (i.e., the spine of the blockchain). This is the minimal data required to re-compute the entire state graph. Diff period could be 1 day (2880 epochs)./{network}/spine/roll-up: Convenience roll-ups for spine diffs.
These buckets support several use-cases:
- Syncing to HEAD using the latest snapshot from
/{network}/latest. - The state-tree for an arbitrary epoch can be downloaded by starting with a nearby historical snapshot and then supplementing it with diff files. For example, the state-tree for epoch 3000 can be accessed by getting the snapshot at epoch 2880 and the diff file for epoch range 2880-5760.
- Initializing a full archival node can be done by downloading all the diff roll-ups. Combined, they contain the entire state-graph.
- Running a message archival server can be done by downloading the spine diff roll-ups.
- Re-validating tipsets can be done in parallel by merging snapshots and diff files.
What and How?
Fuzzy and Archie are two servers hosted in the ChainSafe office. Both belong to the Forest team and are running a Ubuntu variant.
Archie and Fuzzy are accessible through a CloudFlare tunnel. Add this to your
SSH config (~/.ssh/config):
Host archie.chainsafe.dev
  ProxyCommand /usr/local/bin/cloudflared access ssh --hostname %h
  User archie

Host fuzzy-forest.chainsafe.dev
  ProxyCommand /usr/local/bin/cloudflared access ssh --hostname %h
  User fuzzy
If your SSH key has been added to list of authorized keys, you should be able to
directly ssh into archie.chainsafe.dev and fuzzy-forest.chainsafe.dev. If
you key hasn't been added, complain loudly in the #forest slack channel.
Archie
Hardware:
Motherboard:  GIGABYTE B550M
CPU:          AMD Ryzen™ 5 5600G
SSD:          4x SAMSUNG 870 QVO 8 TB
RAM:          G.Skill DIMM 32 GB DDR4-3200
Archie is currently storing the entire Filecoin graph. In the future, this data will be served into the Filecoin p2p network.
Fuzzy
Hardware:
Motherboard:  GIGABYTE B550M
CPU:          AMD Ryzen™ 5 5600G
SSD:          1x Seagate FireCuda 530 2 TB
RAM:          G.Skill DIMM 64 GB DDR4-3200
Fuzzy is meant to run a variety of long-running tasks.
Github Action Runner
Fuzzy is using the standard runner with a default configuration. See https://github.com/actions/runner for details.
The instance can be inspected by running zellij attach runner on the server.
The command to start the runner is cd ~/gc_runner; ./run.sh.
RPC Compatibility
A running Lotus node can be accessed through an RPC interface. The RPC methods are listed here:
- V0 methods (stable): https://github.com/filecoin-project/lotus/blob/master/documentation/en/api-v0-methods.md
- V1 methods (unstable): https://github.com/filecoin-project/lotus/blob/master/documentation/en/api-v1-unstable-methods.md
The current status of compatibility can be checked by comparing a running Forest node with a running Lotus node:
- Build Lotus with support for Calibnet and sync to HEAD. Run Lotus with
LOTUS_FEVM_ENABLEETHRPC=1to enable the Eth RPC methods. - Run Forest against Calibnet and sync to HEAD.
- Run
forest-tool api compare
The output will look like this:
| RPC Method | Forest | Lotus |
|---|---|---|
| Filecoin.ChainGetBlock | Valid | Valid |
| Filecoin.ChainGetGenesis | Valid | Valid |
| Filecoin.ChainGetMessage (67) | InternalServerError | Valid |
| Filecoin.ChainGetMessagesInTipset | MissingMethod | Valid |
| Filecoin.ChainGetTipSetByHeight | Valid | Valid |
| Filecoin.ChainHead | Valid | Valid |
| Filecoin.ChainReadObj | InvalidResponse | Valid |
| Filecoin.Discover | MissingMethod | Valid |
| Filecoin.MpoolPending | Valid | Valid |
| Filecoin.NetAddrsListen | Valid | Valid |
| Filecoin.NetInfo | Valid | MissingMethod |
| Filecoin.NetPeers | Valid | Valid |
| Filecoin.Session | MissingMethod | Valid |
| Filecoin.StartTime | Valid | Valid |
| Filecoin.StateGetActor | InternalServerError | Valid |
| Filecoin.StateMinerPower (76) | MissingMethod | Valid |
| Filecoin.StateNetworkName | Valid | Valid |
| Filecoin.Version | Valid | Valid |
If an entry for Lotus is not marked as Valid, this indicates that the Forest
RPC client is buggy and incorrectly communicates with Lotus.
Limitations
Forest aims at being a drop-in replacement for Lotus and have support for all of
the RPC methods. Note, some methods (like Filecoin.ChainHotGC) are
Lotus-specific and are meaningless in Forest. Such methods should be no-ops in
Forest.
Forest does not yet support mining and none of the mining-related RPC calls will be implemented in the foreseeable future.
Gateway
The lotus-gateway executable is a reverse-proxy that sanitizes RPC calls
before they're forwarded to a Filecoin node. The forest-tool api compare
command will fail if run against a gateway rather than directly against a node.
This means API compatiblity testing has to be done with a local node rather than
api.node.glif.io.
Use mitmproxy
Inspecting RPC calls is best done with a reverse proxy. If Lotus listens to port 1234 and Forest listens to port 2345, run the API compatibility tests through reverse proxies:
mitmproxy --mode reverse:http://localhost:2345 --listen-port 8080mitmproxy --mode reverse:http://localhost:1234 --listen-port 8081forest-tool api compare --forest /ip4/127.0.0.1/tcp/8080/http --lotus /ip4/127.0.0.1/tcp/8081/http
Request / Response pairs will show up in the mitmproxy windows.
Adding a new method
Checklist for adding a new RPC method:
- Add method name in
src/rpc_api/mod.rsand set the access level. - Add request/response data types to
src/rpc_api/data_types.rsas needed. - Add
RpcRequestin the appropriate file insrc/rpc_client/. - Test the method in
src/tool/subcommands/api_cmd.rs. The method should show up asValidfor Lotus andMissingMethodfor Forest. Usemitmproxyto debug. - Implement Forest endpoint in
src/rpc/, add it to the method list insrc/rpc/mod.rs - Verify that the test from step 4 shows
Validfor Forest.
Notes and sketches
The notes found here may be out of date.
Date: 2023-10-21
ChainMuxer state transitions:
flowchart TD
    A[Idle]
    B[Connect]
    C[Bootstrap]
    D[Follow]

    A -->|sync| B
    A -->|skip| D
    B -->|behind| C
    B -->|in-sync| D
    D -->|on-error| A
    C --> A
Once the ChainMuxer is in follow mode, it passes control to the
TipsetProcessor. A typical start-up sequence looks like this:
idlestate: Immediately switch toconnectstate.connectstate: Wait for 5 tipsets from peers. If we're within 1 epoch of the heaviest seen tipset, switch tofollowstate. Otherwise, switch tobootstrapstate.bootstrapstate: Fetch tipsets between the heaviest seen tipset and the last validated tipset. Validate all of those tipsets and return toidlestate.followstate: Pass control to theTipsetProcessorstate machine.
TipsetProcessor state transitions:
flowchart TD
    A[Idle]
    B[FindRange]
    C[SyncRange]

    A -->|new tipset group| B
    B --> C
    C --> A
    C --> B